Build Your own Simplified AngularJS in 200 Lines of JavaScript
Edit · Mar 9, 2015 · 20 minutes read · Follow @mgechev
My practice proved that there are two good/easy ways to learn a new technology:
- Re-implement it by your own
- See how the concepts you already know fit in it
In some cases the first approach is too big overhead. For instance, if you want to understand how the kernel works it is far too complex and slow to re-implement it. It might work to implement a light version of it (a model), which abstracts components that are not interesting for your learning purposes.
The second approach works pretty good, especially if you have previous experience with similar technologies. A proof for this is the paper I wrote - “AngularJS in Patterns”. It seems that it is a great introduction to the framework for experienced developers.
However, building something from scratch and understanding the core underlying principles is always better. The whole AngularJS framework is above 20k lines of code and parts of it are quite tricky. Very smart developers have worked with months over it and building everything from an empty file is very ambitious task. However, in order to understand the core of the framework and the main design principles we can simplify the things a little bit - we can build a “model”.
Scientific modelling is a scientific activity, the aim of which is to make a particular part or feature of the world easier to understand, define, quantify, visualize, or simulate by referencing it to existing and usually commonly accepted knowledge. It requires selecting and identifying relevant aspects…
We can achieve this simplification by:
- Simplifying the API
- Removing components, which are not essential for our understanding of the core concepts
This is what I did in my “Lightweight AngularJS” implementation, which is hosted on GitHub. The code is only with educational purpose and should not be used in production otherwise a kitty somewhere will suffer. I used this method of explaining AngularJS in classes I taught at HackBulgaria and Sofia University. You can also find slides from my talk “Lightweight AngularJS” in the bottom of the blog post.
Before reading the rest of the article I strongly recommend you first to get familiar with the basics of AngularJS. A good start could be this short overview of AngularJS.
Here are some links with code snippets/demos for the following article:
So lets begin with our implementation!
Main Components
Since we are not following the AngularJS implementation completely we will define a set of components and make references to their sources from the original implementation. Although we will not have 100% compatible implementation we will implement most of our framework in the same fashion as it is implemented in AngularJS but with simplified interface and a few missing features.
The AngularJS components we are going to be able to use are:
- Controllers
- Directives
- Services
In order to achieve this functionality we will need to implement the $compile service, which we will call DOMCompiler, the $provider and the $injector, grouped into our component called Provider. In order to have two-way data-binding we will implement the scope hierarchy.
This is how the relation between Provider, Scope and DOMCompiler will look like:
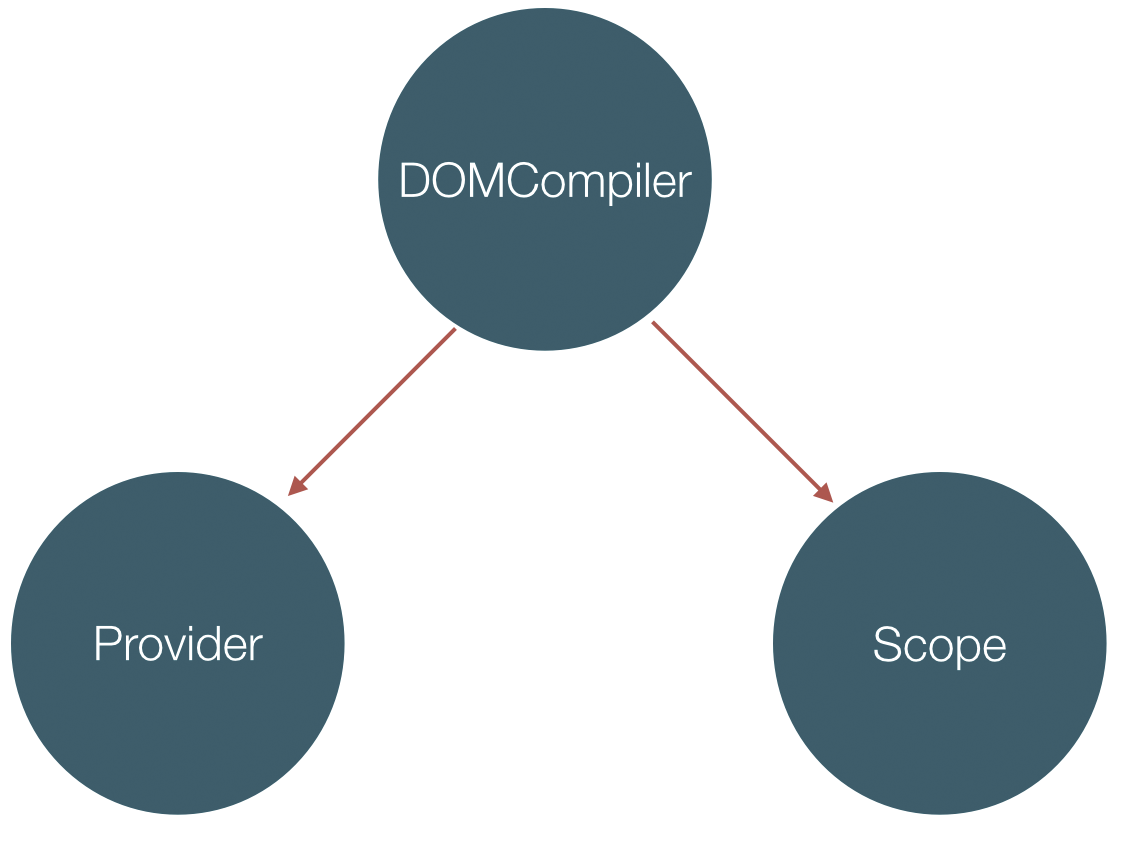
Provider
As mentioned above, our provider will union two components from the original framework:
$provide$injector
It will be a singleton with the following responsibilities:
- Register components (directives, services and controllers)
- Resolve components’ dependencies
- Initialize components
DOMCompiler
The DOMCompiler is a singleton, which will traverse the DOM tree and find directives. We will support only directive, which could be used as attributes. Once the DOMCompiler finds given directive it will provide scope management functionality (since given directive may require a new scope) and invoke the logic associated to it (in our case the link function). So the main responsibilities of this component will be:
- Compile the DOM
- Traverse the DOM tree
- Finds registered directives, used as attributes
- Invoke the logic associated with them
- Manages the scope
Scope
And the last major component in our Lightweight AngularJS, will be the scope. In order to implement the data-binding logic we need to have $scope to attach properties. We can compose these properties into expressions and watch them. When we discover that the value of given expression has changed we can simply invoke a callback (observer) associated with the expression.
Responsibilities of the scope:
- Watches expressions
- Evaluates all watched expressions on each
$digestloop, until stable - Invokes all the observers, which are associated with the watched expression
Theory
In order to have better understanding of the implementation, we need to dig a bit in theory. I’m doing this mostly for completeness, since we will need only basic graph algorithms. If you’re familiar with the basic graph traversal algorithms (Depth-First Search and Breath-First Search) feel free to skip this section.
First of all, what actually graphs are? We can think of given graph as pair of two sets: G = { V, E }, E ⊆ V x V. This seems quite abstract, I believe. Lets make it a bit more understandable. We can think of the set V as different Tinder users and the set E as their matches. For example, if we have the users V = (A, B, C, D) and we have matches between E = ((A, B), (A, C), (A, D), (B, D)), this means not only that A swipes right everyone but also that the edges inside our graph are these matches. Our “social graph” will look like this:
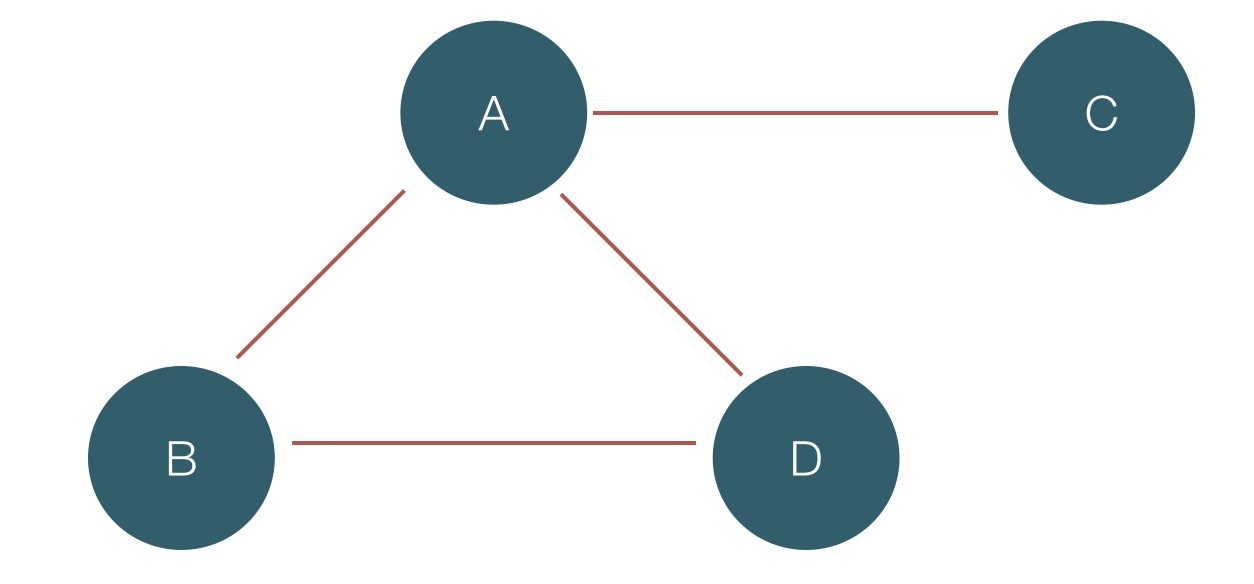
This is an example for undirected graph, since both users like each other. If we have partial match (only one of the users like the other one), we have directed graph. In the case of directed graph, the connections between the nodes will be arrows, to show the direction (i.e. which is the user who is interested in the other one).
Graph theory in AngularJS
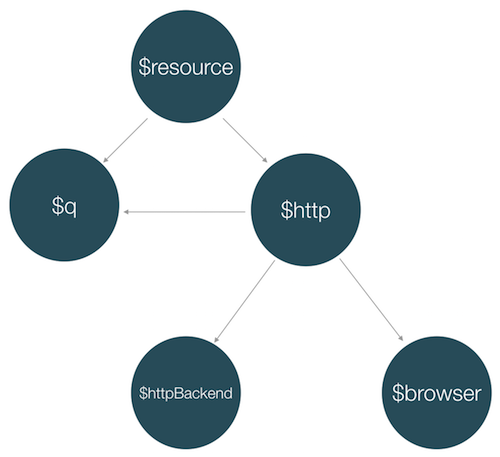
But how we can apply graph theory in our AngularJS implementation? In AngularJS instead of users we have components (services, controllers, directives, filters). Each component may depend (use) another component. So the nodes in our AngularJS graph are the different components and the edges are the relations between them. For example, the graph of the dependencies of the $resource service, will look something like:
There are two more places we are going to use graphs - the DOM tree and the scope hierarchy. For example, if we turn the following HTML:
<html>
  <head>
  </head>
  <body>
    <p></p>
    <div></div>
  </body>
</html>
into a tree, we will get:

For discovering all directives in the DOM tree, we need to visit each element and check whether there is registered directive associated with its attributes. How we can visit all nodes? Well, we can use the depth-first search algorithm, which is used in AngularJS:
1  procedure DFS(G,v):
2      label v as discovered
3      for all edges from v to w in G.adjacentEdges(v) do
4          if vertex w is not labeled as discovered then
5              recursively call DFS(G,w)
Implementation
Since we are done with theory, we can begin our implementation!
Provider
As we said the Provider will:
- Register components (directives, services and controllers)
- Resolve components’ dependencies
- Initialize components
So it will has the following interface:
get(name, locals)- returns service by its name and local dependenciesinvoke(fn, locals)- initializes service by its factory and local dependenciesdirective(name, fn)- registers a directive by name and factorycontroller(name, fn)- registers a controller by name and factory. Note that controllers are not part of the AngularJS’ core. They are implemented through the$controllerservice.service(name, fn)- registers a service by name and factoryannotate(fn)- returns an array of the names of the dependencies of given service
Registration of components
var Provider = {
  _providers: {},
  directive: function (name, fn) {
    this._register(name + Provider.DIRECTIVES_SUFFIX, fn);
  },
  controller: function (name, fn) {
    this._register(name + Provider.CONTROLLERS_SUFFIX, function () {
      return fn;
    });
  },
  service: function (name, fn) {
    this._register(name, fn);
  },
  _register: function (name, factory) {
    this._providers[name] = factory;
  }
  //...
};
Provider.DIRECTIVES_SUFFIX = 'Directive';
Provider.CONTROLLERS_SUFFIX = 'Controller';
The code above provides a simple implementation for registration of components. We define the “private” object called _providers, which contains all factory methods of the registered directives, controllers and services. We also define the methods directive, service and controller, which delegate their call to _register. In controller we wrap the passed controller inside a function for simplicity, since we want to be able to invoke the controller multiple times, without caching the value it returns after being invoked. The method controller will get more obvious after we review the get method and the ngl-controller directive. The only methods left are:
invokegetannotate
var Provider = {
  // ...
  get: function (name, locals) {
    if (this._cache[name]) {
      return this._cache[name];
    }
    var provider = this._providers[name];
    if (!provider || typeof provider !== 'function') {
      return null;
    }
    return (this._cache[name] = this.invoke(provider, locals));
  },
  annotate: function (fn) {
    var res = fn.toString()
        .replace(/((\/\/.*$)|(\/\*[\s\S]*?\*\/))/mg, '')
        .match(/\((.*?)\)/);
    if (res && res[1]) {
      return res[1].split(',').map(function (d) {
        return d.trim();
      });
    }
    return [];
  },
  invoke: function (fn, locals) {
    locals = locals || {};
    var deps = this.annotate(fn).map(function (s) {
      return locals[s] || this.get(s, locals);
    }, this);
    return fn.apply(null, deps);
  },
  _cache: { $rootScope: new Scope() }
};
We have a little bit more logic here so lets start with get. In get we initially check whether we already have this component cached in the _cache object. If it is cached we simply return it (see singleton). $rootScope is cached by default since we want only one instance for it and we need it once the application is bootstrapped. If we don’t find the component in the cache we get its provider (factory) and invoke it using the invoke method, by passing its provider and local dependencies.
In invoke the first thing we do is to assign an empty object to locals if there are no local dependencies. What are the local dependencies?
Local Dependencies
In AngularJS we can think of two types of dependencies:
- Local dependencies
- Global dependencies
The global dependencies are all the components we register using factory, service, filter etc. They are accessible by each other component in the application. But how about the $scope? For each controller we want a different scope, the $scope object is not a global dependency registered the same way as lets say $http or $resource. The same for $delegate when we create a decorator. $scope and $delegate are local dependencies, specific for given component.
Lets go back to the invoke implementation. After taking care of null or undefined for locals value, we get the names of all dependencies of the current component. Note that our implementation will support resolving of dependencies only declared as parameter names:
function Controller($scope, $http) {
  // ...
}
angular.controller('Controller', Controller);
Once we cast Controller into a string we will get the string corresponding to the controllers definition. After that we can simply take all the dependencies’ names using the regular expression in annotate. But what if we have comments in the Controller’s definition:
function Controller($scope /* only local scope, for the component */, $http) {
  // ...
}
angular.controller('Controller', Controller);
A simple regular expression will not work here, because invoking Controller.toString() will return the comments as well, so that’s why we initially strip them by using .replace(/((\/\/.*$)|(\/\*[\s\S]*?\*\/))/mg, '').
Once we get the names of all dependencies we need to instantiate them so that’s why we have the map, which loops over all the strings in the array and calls this.get. Do you notice a problem here? What if we have component A, which depends on B and C and lets say C depends on A? In this case we are going to have infinite loop or so called circular dependency. In this implementation we don’t handle such problems but you can take care of them by using topological sort or keeping track of the visited “nodes” (dependencies).
And that’s our provider’s implementation! Now we can register components like this:
Provider.service('RESTfulService', function () {
  return function (url) {
    // make restful call & return promise
  };
});

Provider.controller('MainCtrl', function (RESTfulService) {
  RESTfulService(url)
  .then(function (data) {
    alert(data);
  });
});
And later we can invoke MainCtrl by:
var ctrl = Provider.get('MainCtrl' + Provider.CONTROLLERS_SUFFIX);
Provider.invoke(ctrl);
Pretty cool, ah? And that’s how we have 1/4 of our Lightweight AngularJS implementation!
DOMCompiler
The main responsibility of the DOMCompiler is to:
- Compile the DOM
- Traverse the DOM tree
- Finds registered directives, used as attributes
- Invoke the logic associated with them
- Manages the scope
The following API is enough:
bootstrap()- bootstraps the application (similar toangular.bootstrapbut always uses the root HTML element as root of the application).compile(el, scope)- invokes the logic of all directives associated with given element (el) and calls itself recursively for each child element ofel. We need to have a scope associated with the current element because that’s how the data-binding is achieved. Since each directive may create different scope, we need to pass the current scope in the recursive call.
And here is the implementation:
var DOMCompiler = {
  bootstrap: function () {
    this.compile(document.children[0],
      Provider.get('$rootScope'));
  },
  compile: function (el, scope) {
    var dirs = this._getElDirectives(el);
    var dir;
    var scopeCreated;
    dirs.forEach(function (d) {
      dir = Provider.get(d.name + Provider.DIRECTIVES_SUFFIX);
      if (dir.scope && !scopeCreated) {
        scope = scope.$new();
        scopeCreated = true;
      }
      dir.link(el, scope, d.value);
    });
    Array.prototype.slice.call(el.children).forEach(function (c) {
      this.compile(c, scope);
    }, this);
  },
  // ...
};
The implementation of bootstrap is trivial. It delegates its call to compile with the root HTML element. What happens in compile is far more interesting.
Initially we use a helper method, which gets all directives associated to the given element. We will take a look at _getElDirectives later. Once we have the list of all directives we loop over them and get the provider for each directive. After that we check whether the given directive requires creation of a new scope, if it does and we haven’t already instantiated any other scope for the given element we invoke scope.$new(), which creates a new scope, which prototypically inherits from the current scope. After that we invoke the link function of the directive, with the appropriate parameters. What follows after that is the recursive call. Since el.children is a NodeList we cast it to an array by using Array.prototype.slice.call, which is followed by recursive call with the child element and the current scope. What does this algorithm reminds you of? Doesn’t it look just like DFS - yes, that’s what it is. So here the graphs came handy as well!
Now lets take a quick look at _getElDirectives:
// ...
_getElDirectives: function (el) {
  var attrs = el.attributes;
  var result = [];
  for (var i = 0; i < attrs.length; i += 1) {
    if (Provider.get(attrs[i].name + Provider.DIRECTIVES_SUFFIX)) {
      result.push({
        name: attrs[i].name,
        value: attrs[i].value
      });
    }
  }
  return result;
}
// ...
This method iterates over all attributes of el, once it finds an attribute, which is already registered as directive it pushes its name and value in the result list.
Alright! We’re done with the DOMCompiler. Lets go to our last major component:
Scope
This might be the trickiest part of the implementation because of the dirty checking functionality. In AngularJS we have the so called $digest loop. Basically the whole data-binding mechanism happens because of watched expressions, which are getting evaluated in the $digest loop. Once this loop is called it runs over all the watched expressions and checks whether the last value we have for the expression differs from the current result of the expression’s evaluation. If AngularJS finds that they are not equal, it invokes the callback associated with the given expression. An example for a watcher is an object { expr, fn, last }, where expr is the watched expression, fn is the function, which should be called once the expression has changed and last is the last known value of the expression. For instance, we can watch the expression foo with a callback, which on change is being invoked with the expression’s value and sets the innerHTML of given element (a simplified version of what ng-bind does).
The scope in our implementation has the following methods:
$watch(expr, fn)- watches the expressionexpr. Once we detect change in theexprvalue we invokefn(the callback) with the new value$destroy()- destroys the current scope$eval(expr)- evaluates the expressionexprin the context of the current scope$new()- creates a new scope, which prototypically inherits from the target of the call$digest()- runs the dirty checking loop
So lets dig deeper the scope’s implementation:
function Scope(parent, id) {
  this.$$watchers = [];
  this.$$children = [];
  this.$parent = parent;
  this.$id = id || 0;
}
Scope.counter = 0;
We simplify the AngularJS’ scope significantly. We will only have a list of watchers, a list of child scopes, a parent scope and an id for the current scope. We add the “static” property counter only in order to keep track of the last created scope and provide a unique identifier of the next scope we create.
Lets add the $watch method:
Scope.prototype.$watch = function (exp, fn) {
  this.$$watchers.push({
    exp: exp,
    fn: fn,
    last: Utils.clone(this.$eval(exp))
  });
};
In the $watch method all we do is to append a new element to the $$watchers list. The new element contains a watched expression, a callback (observer) and the last result of the expression’s evaluation. Since the returned value by this.$eval could be a reference to something, we need to clone it.
Now lets see how we create and destroy scopes!
Scope.prototype.$new = function () {
  Scope.counter += 1;
  var obj = new Scope(this, Scope.counter);
  Object.setPrototypeOf(obj, this);
  this.$$children.push(obj);
  return obj;
};

Scope.prototype.$destroy = function () {
  var pc = this.$parent.$$children;
  pc.splice(pc.indexOf(this), 1);
};
What we do in $new is to create a new scope, with unique identifier and set its prototype to be the current scope. After that we append the newly created scope to the list of child scopes of the current scope. In destroy, we remove the current scope from the list of its parent’s children.
Now lets take a look at the legendary $digest:
Scope.prototype.$digest = function () {
  var dirty, watcher, current, i;
  do {
    dirty = false;
    for (i = 0; i < this.$$watchers.length; i += 1) {
      watcher = this.$$watchers[i];
      current = this.$eval(watcher.exp);
      if (!Utils.equals(watcher.last, current)) {
        watcher.last = Utils.clone(current);
        dirty = true;
        watcher.fn(current);
      }
    }
  } while (dirty);
  for (i = 0; i < this.$$children.length; i += 1) {
    this.$$children[i].$digest();
  }
};
Basically we run our loop until it is dirty and by default it is clean. The loop “gets dirty” only if we detect that that result of the evaluation of given expression differs from its previously saved value. Once we detect such “a dirty” expression we run a loop over all watched expressions all over again. Why we do that? We may have some inter-expression dependencies, so one expression may change the value of another one. Thats why we need to run the $digest loop until everything gets stable. If we detect that the result of the evaluation of given expression differs from its previous value we simply invoke the callback associated to the expression, update the last value and mark the loop as dirty.
Once we’re done we invoke $digest recursively for all children of the current scope. So one more time we apply what we learned (or already knew) about graph theory! One thing to note here is that we may still have circular dependency (a cycle in the graph), so we should be aware of that! Imagine we have:
function Controller($scope) {
  $scope.i = $scope.j = 0;
  $scope.$watch('i', function (val) {
    $scope.j += 1;
  });
  $scope.$watch('j', function (val) {
    $scope.i += 1;
  });
  $scope.i += 1;
  $scope.$digest();
}
In this case we will see:
at given moment…
And the last (and super hacky) method is $eval. Please do not do that in production, this is a hack for preventing the need of creating our custom interpreter of expressions:
// In the complete implementation there're
// lexer, parser and interpreter.
// Note that this implementation is pretty evil!
// It uses two dangerouse features:
// - eval
// - with
// The reason the 'use strict' statement is
// omitted is because of `with`
Scope.prototype.$eval = function (exp) {
  var val;
  if (typeof exp === 'function') {
    val = exp.call(this);
  } else {
    try {
      with (this) {
        val = eval(exp);
      }
    } catch (e) {
      val = undefined;
    }
  }
  return val;
};
We check whether the watched expression is a function, if it is we call it in the context of the current scope. Otherwise we change the context of execution, using with and later run eval for getting the result of the expression. This allows us to evaluate expressions like: foo + bar * baz(), or even more complex JavaScript expressions. Of course, we won’t support filters, since they are extension added by AngularJS.
Directives
So far we can’t anything useful with the primitives we have. In order to make it rocks we need to add a few directives and services. Lets implement ngl-bind (called ng-bind in AngularJS), ngl-model (ng-model), ngl-controller (ng-controller) and ngl-click (ng-click)
ngl-bind
Provider.directive('ngl-bind', function () {
  return {
    scope: false,
    link: function (el, scope, exp) {
      el.innerHTML = scope.$eval(exp);
      scope.$watch(exp, function (val) {
        el.innerHTML = val;
      });
    }
  };
});
ngl-bind doesn’t require a new scope. It only adds a single watcher for the expression used as value of the ngl-value attribute. In the callback, when $digest detects a change, we set the innerHTML of the element.
ngl-model
Our alternative of ng-model will work only with text inputs. So here is how it looks like:
Provider.directive('ngl-model', function () {
  return {
    link:  function (el, scope, exp) {
      el.onkeyup = function () {
        scope[exp] = el.value;
        scope.$digest();
      };
      scope.$watch(exp, function (val) {
        el.value = val;
      });
    }
  };
});
We add onkeyup listener to the input. Once the value of the input is changed we call the $digest method of the current scope, in order to make sure that the change in the property will reflect all other watched expressions, which have the given property as dependency. On change of the watched value we set the element’s value.
ngl-controller
Provider.directive('ngl-controller', function () {
  return {
    scope: true,
    link: function (el, scope, exp) {
      var ctrl = Provider.get(exp + Provider.CONTROLLERS_SUFFIX);
      Provider.invoke(ctrl, { $scope: scope });
    }
  };
});
We need a new scope for each controller, so that’s why the value for scope in ngl-controller is true. This is one of the places where the magic of AngularJS happens. We get the required controller by using Provider.get, later we invoke it by passing the current scope. Inside the controller, we can add properties to the scope. We can bind to these properties by using ngl-bind/ngl-model. Once we change the properties’ values we need to make sure we’ve invoked $digest in order the watchers associated with ngl-bind and ngl-model to be invoked.
ngl-click
This is the last directive we are going to take a look at, before we’re able to implement a “useful” todo application.
Provider.directive('ngl-click', function () {
  return {
    scope: false,
    link: function (el, scope, exp) {
      el.onclick = function () {
        scope.$eval(exp);
        scope.$digest();
      };
    }
  };
});
We don’t need a new scope here. All we need is to evaluate an expression and invoke the $digest loop once the user clicks a button.
Wiring Everything Together
In order to make sure we understand how the data-binding works, lets take a look at the following example:
<!DOCTYPE html>
<html lang="en">
<head>
</head>
<body ngl-controller="MainCtrl">
  <span ngl-bind="bar"></span>
  <button ngl-click="foo()">Increment</button>
</body>
</html>Provider.controller('MainCtrl', function ($scope) {
$scope.bar = 0;
$scope.foo = function () {
$scope.bar += 1;
};
});Lets follow what is going on in using the following diagram:
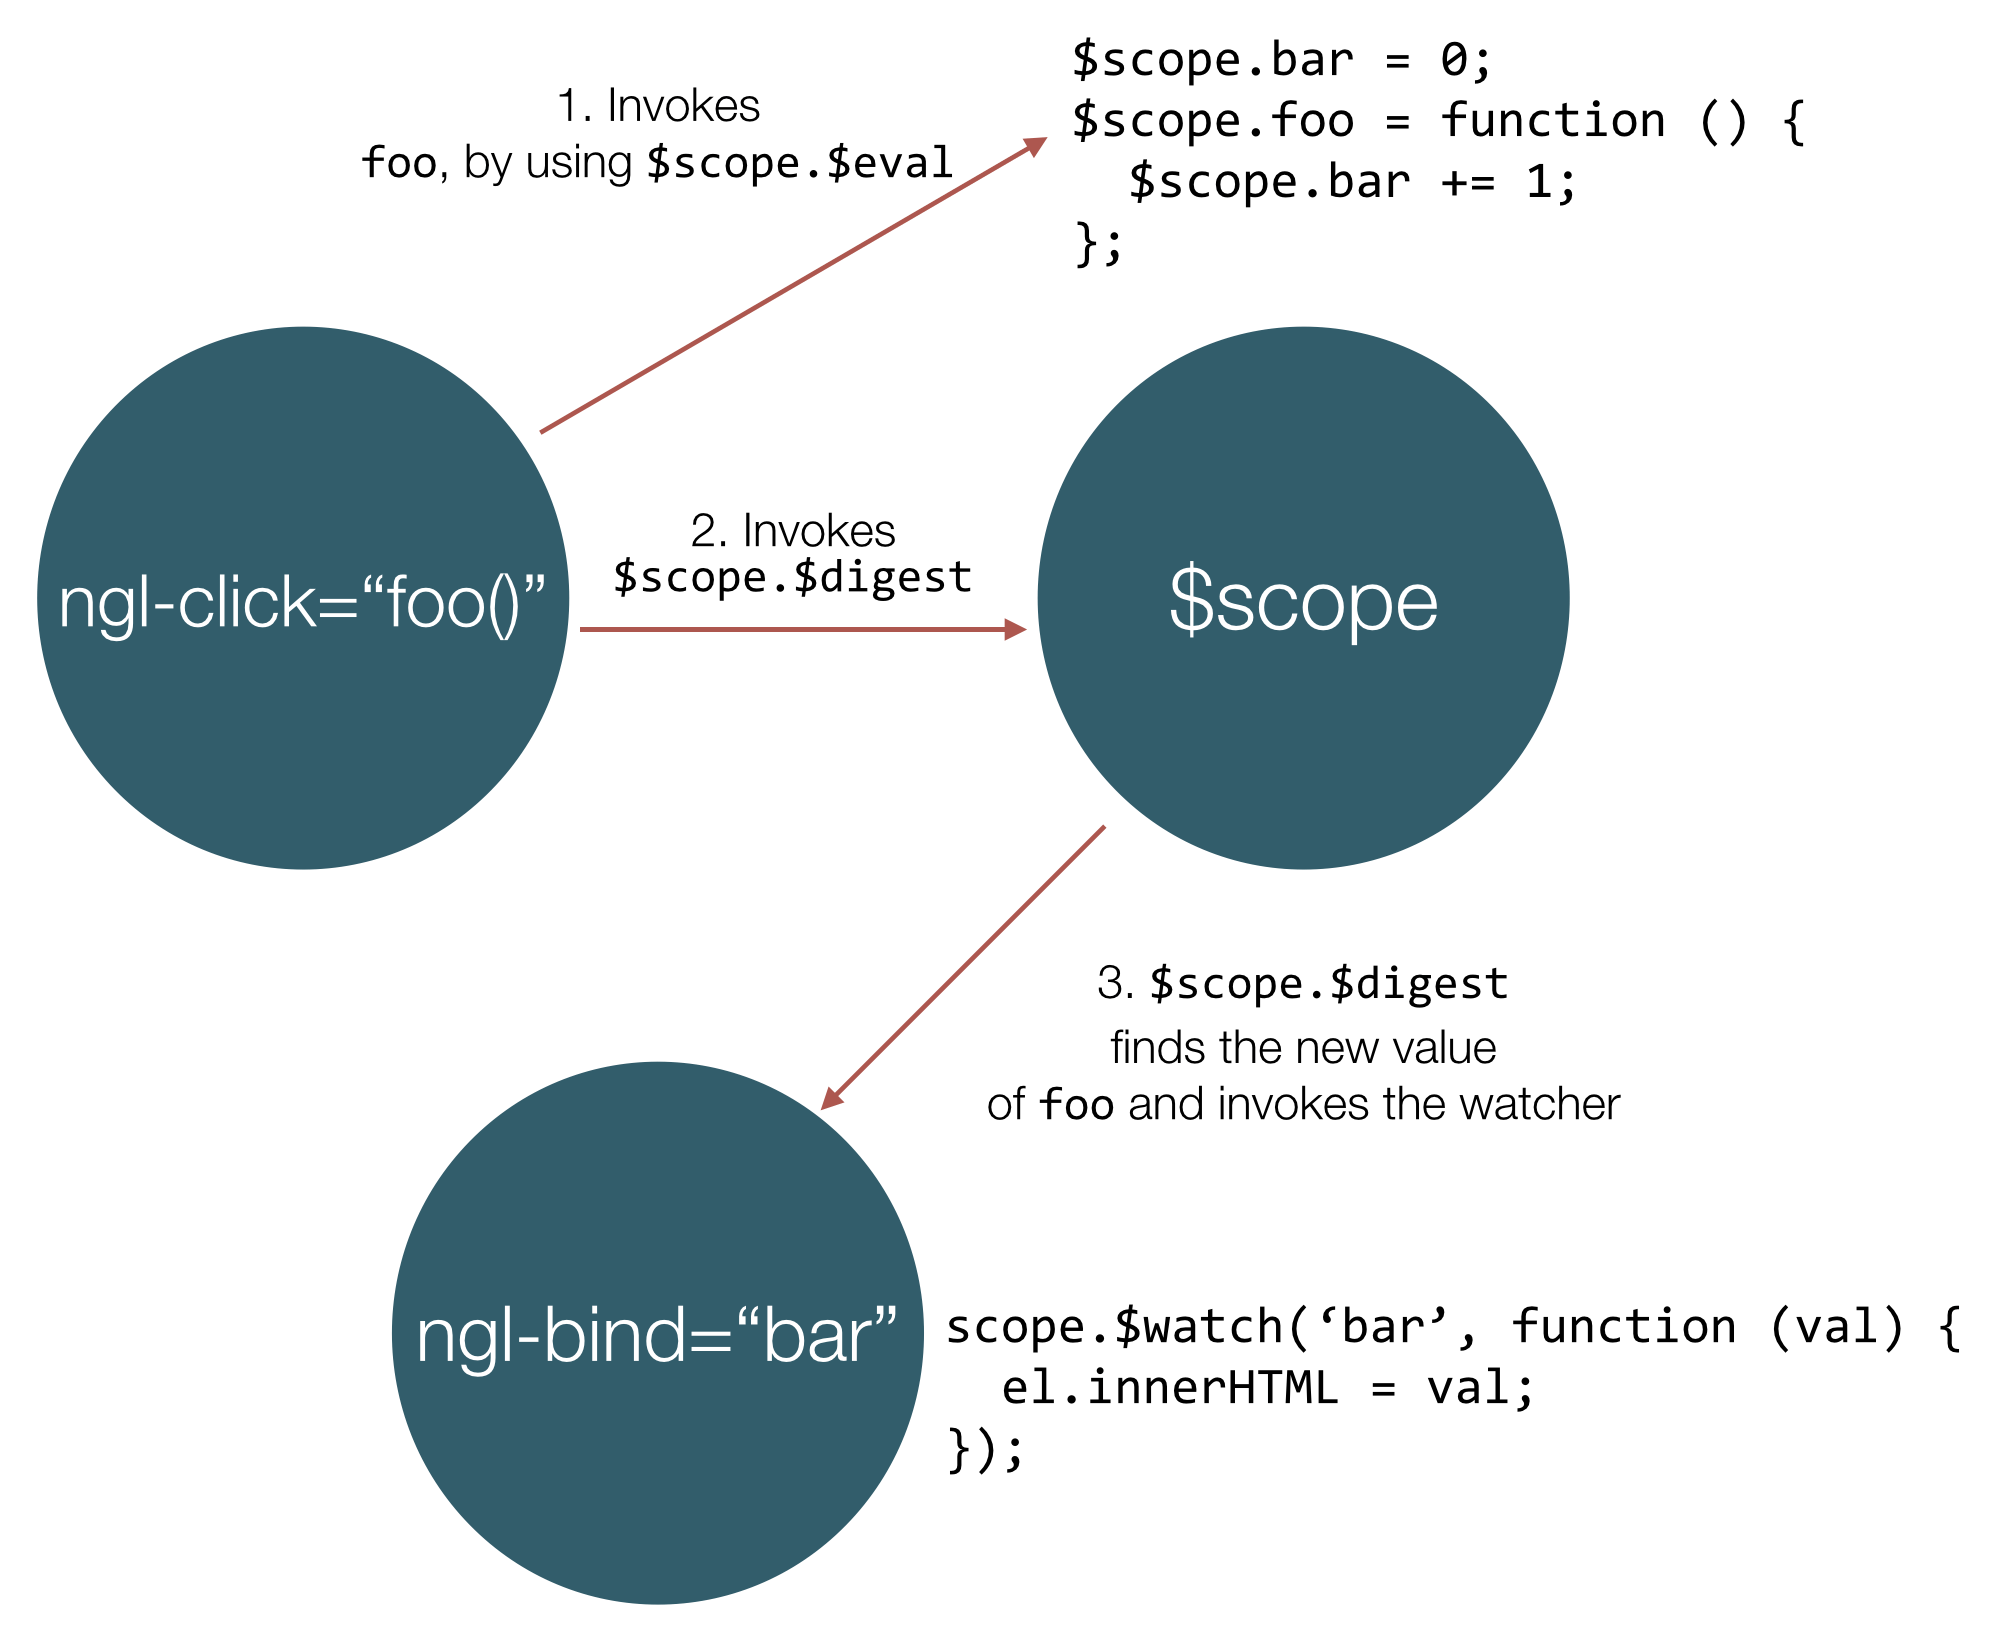
Initially the ngl-controller directive is found by the DOMCompiler. The link function of this directive creates a new scope and pass it to the controller’s function. We add bar property, which is equals to 0 and a method called foo, which increments bar. The DOMCompiler finds ngl-bind and adds a watcher for the bar property. It also finds ngl-click and adds click event handler to the button.
Once the user click on the button, the foo method is being evaluated by calling $scope.$eval. The $scope used is the same on, passed as value to MainCtrl. Right after that, ngl-click invokes $scope.$digest. $digest loops over all watchers and detects change in the value of the expression bar. Since we have associated callback for it (the one added for ngl-bind) we invoke it and update the value of the span element.
Conclusion
The framework we just built is far from a usable into production one, however some of its features:
- Data-binding
- Dependency Injection
- Separation of Concerns
work in a similar way they do in AngularJS. This helps understanding AngularJS in deep much easier.
But still you should not forget to not use this code in production, much better would be to just bower install angular and enjoy!

And here are the slides from my talk “Lightweight AngularJS” as promised: