Scalable Single-Page Application Architecture
Edit · Apr 10, 2016 · 21 minutes read · Follow @mgechev
In order to have better understanding of the following blog post you should be familiar with the fundamentals of the object-oriented and functional programming. I also strongly encourage you to explore the redux pattern.
A couple of months ago I started working on the first version of a Silicon Valley-based startup. The project is a single-page application with quite dynamic business requirements. As in most modern single-page applications we have a fat client which encapsulates decent amount of business logic and state.
Requirements
From my past experience working on startup projects, it was clear that the product will have quite dynamic requirements. It’s in early stage of development and in quite competitive business environment.
Scalable Communication Layer
We have relatively stable business domain, however, there are several external actors which will mutate the state of the application. We have the usual:
- User of the application.
- RESTful API.
On top of that we may (or may not) have the following:
- Other parties who have established p2p connection with the current user.
- Real-time communication with application server.
Given the multiple communication protocols (HTTP, WebSocket, UDP via WebRTC) we need different package formats:
- JSON-based for HTTP and/or WebSocket
- JSON-RPC for WebSocket
- BERT or BERT-RTC for WebRTC and/or WebSocket
The BERT protocol is essential for efficient p2p communication, especially when transferring binary data, such as images or any other which textual representation is generally redundant and inefficient.
Given all the services we need to communicate with, RxJS seems like a perfect fit for organization of all the asynchronous events that the application needs to handle. We can multiplex several data streams over the same communication channel using hot-observers and declaratively filter, transform, process them, etc.
Predictable and Explicit State Management
As we already mentioned, there are multiple state mutation sources. The user is the most obvious one, the push notifications that we will get from the real-time services is another and the other peers we communicate with using WebRTC are a third source. Having a predictable state management is quite essential in order to not reach a point where we have different versions of the store, containing different data.
Another requirement for the state management being predictable is to make the mutations explicit. We want to have a single place where the we modify the domain objects happens; we definitely don’t want to allow owning a reference to a domain object and modify its properties from any place in the application.
And finally, we want to own a single reference for given business entity. We don’t want to have several domain objects representing different business entities. This way we’ll introduce additional inconsistencies, especially if the objects differ.
There are many patterns which help us achieve predictable state management. Currently the most popular one is redux. In order to have type safety and good tooling we bet on TypeScript.
Some may argue that empowering purely functional language will help us reduce the side effects inside of the applications even further compared to an imperative language like TypeScript. I completely agree with this, and I am a big fan of Elm and ClojureScript myself. However, our team needs to scale.
Given the current demand of software engineers on the market it is hard to find suitable specialists. We’d be limiting the circle of possible candidates even further if I set the requirements “experience in Elm and ClojureScript”.
We found the golden mean between purity and scalable team in redux with TypeScript. Redux helps us with the predictable state management and TypeScript helps us with type checking and easier refactoring. Owning a single instance of the domain objects is a problem which could be solved with the identity map pattern. It can be easily integrated in redux, given that our entire state is represented as a directed-acyclic graph.
Talking about team…
Modular Design
As mentioned, the team will scale. The level of experience of the team members will differ. This means that multiple developers with different level of expertise need to work together on the same project. In a typical scenario, most junior team members will be unfamiliar with the functional paradigm. However, this should not drag the project down by making them unproductive. In order to help them get started easier with the project we can provide a high-level abstractions which makes them feel they are using something that they are already familiar with. Such abstraction can make them feel building a typical MVC application.
The layered diagram below shows the core modules of the architecture we stopped on:
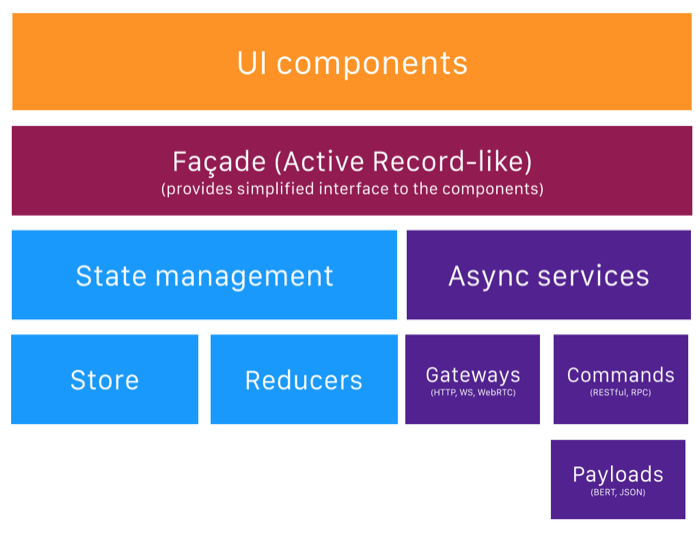
The top layer includes the UI components that the user is going to directly interact with, for instance, dialogs, forms, etc.
The facade below the UI components’ layer represents “a set of objects that provide a simplified interface to a larger body of code”. Basically, the main purpose of this layer is to provide a set of classes that allow us to trigger application specific actions that will augment the reducers’ calls, and forward actions to async services. The reducers and the state from the diagram above are the exact same components known from the redux pattern.
From now on, for simplicity lets call our facades models. For instance, if we are developing a game, inside of our GameComponent we will use the GameModel which abstracts the store mutation, as well as the async services.
Another core role of the facades is to forward the actions used by the reducers to a set of async services. Once a given action is being triggered, it will be passed to a set of async services which will handle it. On higher-level the models look exactly like Active Record because they are mediators between the UI and the data layer. However, note that the model delegates the business logic to the reducers, and the communication with external services to the AsyncServices.
We can think of the async services as remote proxies to external services. They map the application specific actions to remote commands. Then why is this component called async service instead of remote service? Async services should handle all calls to asynchronous APIs,including WebRTC, WebSocket, as well as IndexDB.
In case we have an async service that represents a proxy to a RESTful API, it will hold a reference to an HTTP gateway. Once the async service receives an instance of an action, it will map the action to a RESTful command and sent it through the gateway.
Notice that given model (facade) should not be coupled to any specific communication channel, neither an async service. This means that the facade should invoke specific set of async services depending on the context it is used in.
Context Dependent Implementations
The context of the facades in our application is going to be determined by the components they are used in. For instance, lets suppose we are developing a game which allows multi-player and single-player modes. In case of single-player we want to send metadata to the game server; in case of multi-player we want to send metadata between players as well as to the server.
This means that inside of the SinglePlayerComponent we want our GameModel (the facade) to use the GameServer async service; inside of MultiPlayerComponent the GameModel should use GameServer as well as GameP2PService.
Having such context dependent dependency instantiation is a perfect candidate for using Dependency Injection Pattern.
Lazy-loading
The application’s codebase will grow a lot. It may become more than 100k lines of JavaScript, which means that lazy-loading of the individual bounded contexts is essential.
If we think in terms of the game we mentioned earlier, we want to have the following directory structure:
.
└── src
    ├── multi-player
    │   ├── commands
    │   ├── components
    │   └── gateways
    ├── single-player
    │   └── components
    ├── home
    │   └── components
    └── shared
Once the user opens the home screen we want to load all files from the home directory, together with the shared directory. If right after that the user navigates to the single-player page we want to download only the content of the single-player directory, etc.
Using this directory structure, we can easily distribute the application development among the individual team members by providing one such bounded context per a developer, for instance.
Other requirements
For the architecture we also have the standard set of requirements including:
- Testability. The business layer’s complexity may grow which means that we need to have easy way to test it.
- Maintability. We don’t want to rewrite our front-end when we have new requirements.
- Open/closed. This way we’ll be able to react easier on the dynamically changing requirements.
Technology Stack
After discussion of the architecture and potential extension points of the application, we considered different technologies. Our prime candidates were React and Angular 2. We have previous successful experience with React and a redux-like architecture.
The only things we struggled with in our React project were lazy-loading and context dependent dependency instantiation. The react-router supports lazy-loading, however, we still miss the lack of dependency injection. Another great selling point of Angular 2, for us, is its WebWorkers support.
Our final tech stack we choose is as follow:
Before going any further I want to mention that the architecture that I am going to explain below is framework agnostic, this means that you can apply it in Angular 2, React or any other framework. There could be slight differences in terms of syntax and lack of dependency injection.
Disclaimer
The explained architecture is abstract. This means that it doesn’t define specific interfaces but a concepts which will help you structure your application.
It works great for us but I cannot promise that it will be perfect fit for you, the way I’ve described it here. You may need to reshape it, bend it and play with it to make sure it will fulfill your needs.
Finally, the architecture doesn’t provide rules that you must follow. Instead, it provides guidelines and suggestions of how you can spread the responsibilities across the individual pieces it defines.
Sample Application
A sample application which implements the architecture we’re going to talk about can be found here. It uses Angular 2 and rxjs, but as mentioned, you can apply it successfully in React as well.
In order to be able to explain the concepts easier, I’ll put them into the context of the application from above. Basically the app is a game which helps you improve your typing speed. It has two modes:
- Single player - allows you to practice typing. This mode gives you text and measures how fast you can reproduce it.
- Multi player - allows you to compete with another player through the network. Both players connect to each other through WebRTC. Once the connection is established they start exchanging messages related to the game progress of one another. When any of the players completes her challenge she is declared as the winner:
Introducing the Architecture
Now lets go through the layers from the diagram above, starting with the:
UI Components
The UI components layer contains framework-specific components (in our case Angular 2). The components can hold some state but it must be clear what part of the application state belongs to the store and what can be left inside of the components.
The entire component tree is nothing more than the composite pattern and we have controllers associated to the individual components.

Here’s a sample implementation of the GameComponent from the sample application explained above:
@Component({
  // Some component-specific declarations
  providers: [GameModel]
})
export class GameComponent implements AfterViewInit {
  // declarations...
  @Input() text: string;
  @Output() end: EventEmitter<number> = new EventEmitter<number>();
  @Output() change: EventEmitter<string> = new EventEmitter<string>();

  constructor(private _model: GameModel, private _renderer: Renderer) {}

  ngAfterViewInit() {
    // other UI related logic
    this._model.startGame();
  }

  changeHandler(data: string) {
    if (this.text === data) {
      this.end.emit(this.timer.time);
      this._model.completeGame(this.timer.time, this.text);
      this.timer.reset();
    } else {
      this._model.onProgress(data);
      // other UI related logic
    }
  }

  reset() {
    this.timer.reset();
    this.text = '';
  }

  invalid() {
    return this._model.game$
      .scan((accum: boolean, current: any) => {
        return (current && current.get('invalid')) || accum;
      }, false);
  }
}
The component above has the following important characteristics:
- It has a set of inputs and outputs that define its API, i.e. how it can be used in other components in the component tree.
- It encapsulates some component-specific state that is not important for the rest of the application, i.e. not included in the application’s store (for instance the current
textthat the user has entered). - It uses the
GameModelwhich is a sample instance from the Facade layer.
The GameModel provides access to specific part of the application’s state that is important for given cluster of components. For instance, the GameComponent is interested in the current game, so the GameModel provides access to this part of the state through the game$ property.
Notice that above the state is represented as a stream of immutable objects. This means that once the state changes the GameComponent will get new instance of it immediately, and this instance will be an immutable object. Basically the game$ property of the GameModel’s instance is of type Observable<Game> where Game is an immutable record. The model will map the entire state tree and select (and provide) only the part of it which is relevant. For instance, if our state tree contains a set of users as well, the GameModel will take only the part of the store representing game, ignoring the users. On the diagram below you can see how the model mediates between the state tree and the component tree:
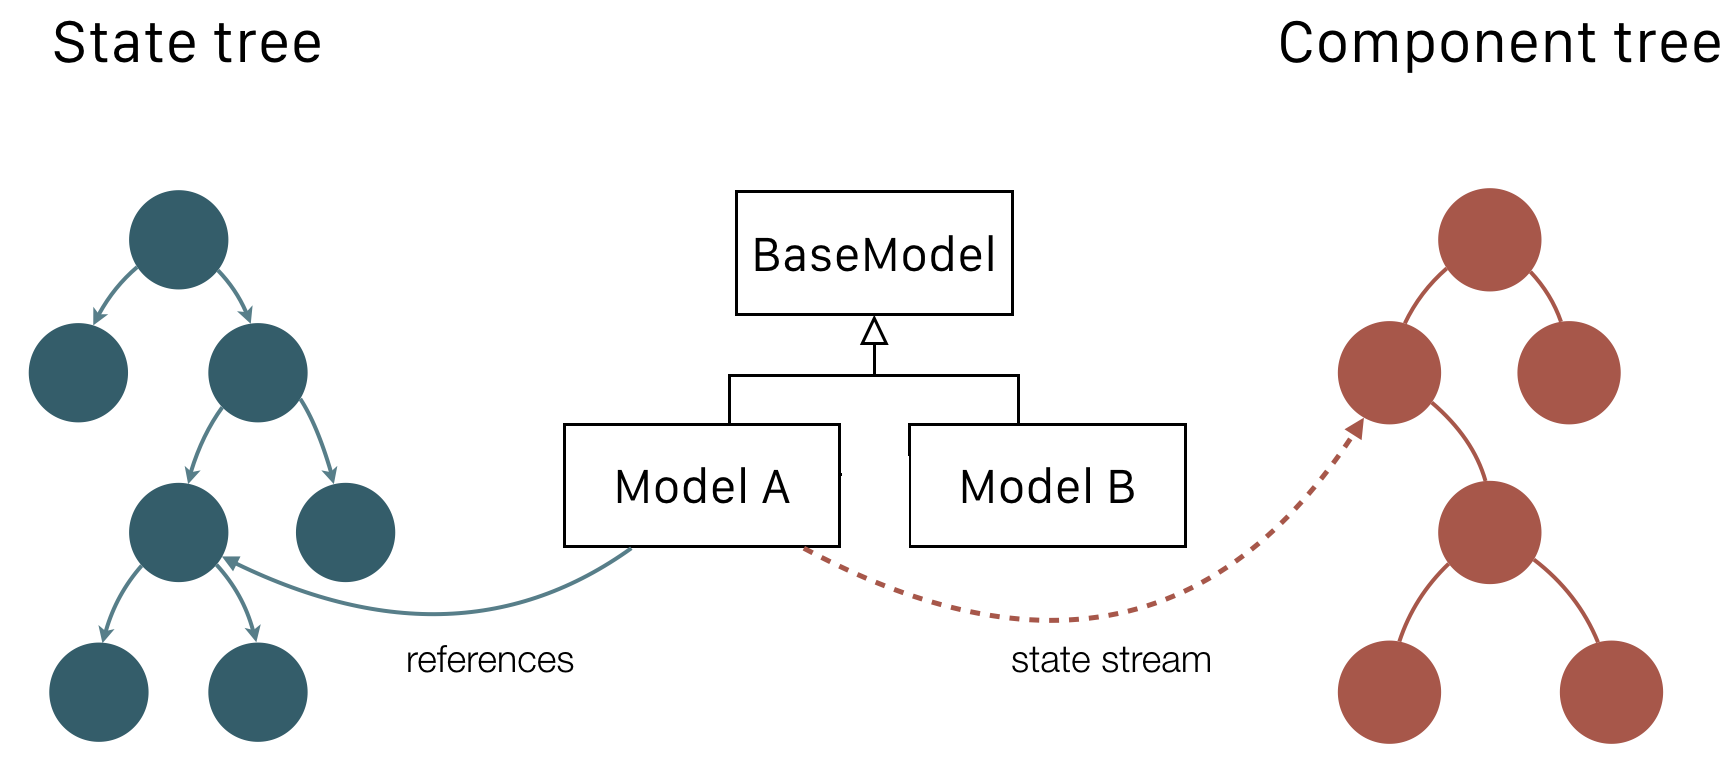
Using high-level abstraction such as the GameModel allows new team members to become productive quickly. They can start developing UI components that use the model for propagating state changes. All the new team members need to be familiar with is how to develop Angular 2 components and have basic experience with RxJS data streams. They don’t have to be aware of any communication protocol, packages’ data format, redux, etc.
Model Definition
The facade used by the game component is the GameModel. Here’s its definition:
@Injectable()
export class GameModel extends Model {

  games$: Observable<string>;
  game$: Observable<string>;

  constructor(protected _store: Store<any>,
              @Optional() @Inject(AsyncService) _services: AsyncService[]) {
    super(_services || []);
    this.games$ = this._store.select('games');
    this.game$ = this._store.select('game');
  }

  startGame() {
    this._store.dispatch(GameActions.startGame());
  }

  onProgress(text: string) {
    this.performAsyncAction(GameActions.gameProgress(text, new Date()))
      .subscribe(() => {
        // Do nothing, we're all good
      }, (data: any) => {
        if (data.invalidGame)
          this._store.dispatch(GameActions.invalidateGame());
      });
  }

  completeGame(time: number, text: string) {
    const action = GameActions.completeGame(time, text);

    // We perform an optimistic update here,
    // which we may want to undo if the async action fails.
    this._store.dispatch(action);
    this.performAsyncAction(action)
      .subscribe(() => console.log('Done!'));
  }
}
The class accepts as dependency an instances of the Store as the _store variable, which is the ngrx store, and a set of AsyncServices.
The model can mutate the store by dispatching actions, created by the action creators. We can think of the actions as commands, or even a simply dummy instructions that have meaning only within the boundaries of our application. They contain an action type (a string) and a payload which provides enough information to the reducers in order to update the store.
The GameModel can start the game by dispatching the startGame action, created by the GameActions action creator:
this._store.dispatch(GameActions.startGame());
Calling the dispatch method of the store with given action will apply all the registered reducers to the store, with the passed action as an argument and will produce a new store. This store will be then emitted to the view through the game$ observable. The entire flow represents something like:
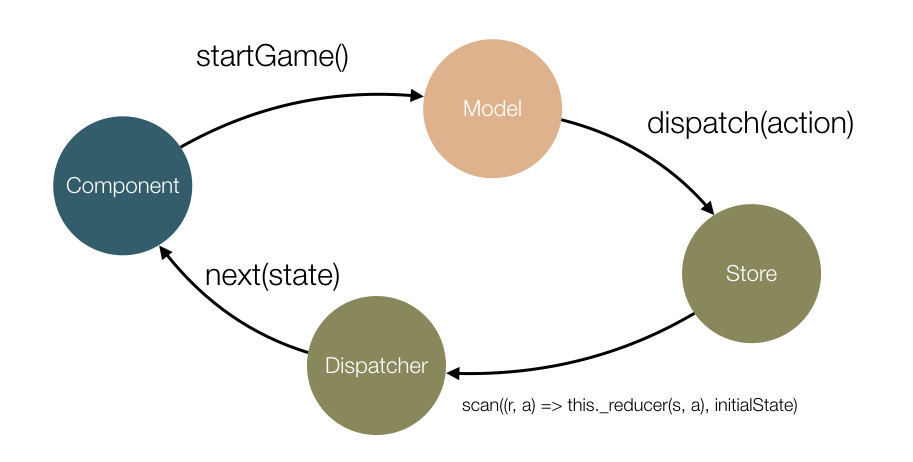
First, the action will go to the store. After that the store will invoke all the reducers and produce a new state. This state will be emitted by the observable game$ which will be handled by the components inside of the UI.
The reducer is simply a pure function which produces the same output when given the same input. Here’s the implementation of the reducer that will handle the startGame action:
export const gameReducer = (state: any = initialState.get('game'), action: Action) => {
  switch (action.type) {
    case START_GAME:
      state = fromJS({});
    break;

    case INVALID_GAME:
      state = state.set('invalid', true);
    break;

    case GAME_PROGRESS:
      state = state.set('currentText', action.payload.text);
    break;
  }
  return state;
};
Now let’s trace what will happen when we emit the invalidGame action.
-
The store will invoke all the reducers associated to it, including the
gameReducerdefined above. -
The
gameReducerwill produce a new state by setting theinvalidproperty totrueof thestateobject. -
The observer associated to the
game$observable will trigger a new value. -
The
GameComponentabove will handle the change in the state with:invalid() { return this._model.game$ .scan((accum: boolean, current: any) => { return (current && current.get('invalid')) || accum; }, false); } -
Inside of the template of the game we will use the value producer by
invalid()by using:<div [hide]="!(invalid() | async)"> <h1>The game is invalid...</h1> </div>
The last sections above are mostly related to ngrx/redux specific details. Now let’s take a look at how we use the:
Async Services
AsyncService is an abstract class which looks the following way:
export abstract class AsyncService {
  abstract process(data: Action): Observable<any>;
}
When the onProgress method of the GameModel is invoked, we’ll performAsyncAction which in this case is the gameProgress action gotten from the GameActions action creator. performAsyncAction will iterate over the _services and invoke their process methods:
export abstract class Model {

  constructor(private _services: AsyncService[]) {}

  protected performAsyncAction(action: Action) {
    return Observable.merge.apply(Observable, (this._services || []).map(s => s.process(action)));
  }
}
Once the services’ call completes we can handle the result returned by them. For instance, above when the services’ call fails we emit the gameInvalid action and change the state of the game. Notice that in case of multiple services making the model responsible for handling their responses won’t be practical because it doesn’t know anything about the services it uses. In this case the logic for handling responses by an async service should be moved to the service itself.
The different services can use different communication protocol, which means different data packages. For instance, the GameServer can use JSON-RPC-like messages but in multi-player mode we may want to exchange binary date through BERT packages.
Also, the format of the data can be different. For instance, lets say we want to send the entire text that the user has typed in case of the GameServer but we want to send only the change between the current text value and the previous value in case of the GameP2PService (used in multi-player mode).
The responsibility of mapping the domain model to the remote service’s model representation, as well as taking care of the format of the packages belongs to the AsyncService itself. It is the only module which “understands” the remote service.
For instance, lets take a look at the implementation of the GameP2PService:
@Injectable()
export class GameP2PService extends AsyncService {

  constructor(private _rtcGateway: WebRTCGateway, private _store: Store<any>) {
    super();
    _rtcGateway.dataStream
      .map((data: any) => JSON.parse(data.toString()))
      .subscribe((command: any) => {
        switch (command.method) {
          case PROGRESS:
            _store.dispatch(P2PGameActions.partnerProgress(command.payload.text));
            break;
          case COMPLETE:
            _store.dispatch(P2PGameActions.partnerCompleted());
            break;
        }
      });
  }

  process(action: Action) {
    let baseCommand = new RPCCommand();
    baseCommand.payload = new JsonPayload();
    baseCommand.gateway = this._rtcGateway;
    let commandBuilder = buildP2PCommand(action);
    if (!commandBuilder) {
      console.warn('This command is not supported');
      return Observable.create((obs: Observer<any>) => obs.complete());
    } else {
      return commandBuilder(baseCommand).invoke();
    }
  }
}
Inside of this service’s constructor we have subscribed to the messages received by the WebRTC gateway and we are transforming it by using the RxJS’s map operator. We process the individual packages we’ve received by mapping them to actions and emitting them using the store.
Inside of the process method we need to do two things:
- Map the received as parameter action to the corresponding command that will be processed by the remote service.
- Dispatch command using the proper gateway.
Note that we delegate the mapping between application-specific actions and remote commands to a command builder. The command builder defines a set of functions which map the individual actions to a specific command which serialized version is understandable by the remote service.
Gateways
Gateway is nothing more than a concrete implementation of the following abstract class:
export abstract class Gateway {

  // Emits responses or push messages
  // from the remote service.
  dataStream: Observable<any>;

  // Emits true in case we've established
  // connection to the remote machine, otherwise false.
  connectionEvents: Observable<boolean>;

  protected _emitter: Observer<any>;

  protected _connectionEventsEmitter: Observer<boolean>;

  // Initializes the Gateway's properties
  constructor() {
    this.dataStream = Observable.create((emitter: Observer<any>) => {
      this._emitter = emitter;
    }).share();
    this.connectionEvents = Observable.create((obs: Observer<boolean>) => {
      this._connectionEventsEmitter = obs;
    }).share();
  }

  // An abstract method which should be implemented by a specific
  // concrete implementation.
  abstract send(command: Command): Observable<any>;
}
We declare two Observables:
dataStream- emits new received packages. The gateway only emits these packages but does not handle them. The async service is responsible for decoding (in fact the specific command payload, described below, will decode them) and processing them.connectionEvents- emits events when we connect/disconnect from the gateway (useful in case of WebSockets and WebRTC).
And a single public method:
send- sends data and returns an observable. Why I decided to return observable instead of promise?
Now let’s see what we actually send through the network:
Commands and Payloads
We want to not couple the individual commands to the transport protocol. This means that we should be able to:
- Send RPC commands through an HTTP, WebSockets, WebRTC gateways.
- Use BERT/JSON or whatever for payloads of RESTful/RPC commands.
This brings great flexibility and reusability by allowing us to use different command types (REST, RPC, etc.), with different payloads (JSON, BERT, etc.), via different gateways (WebSocket, HTTP, WebRTC, etc.).
The Command class looks like:
export abstract class Command {

  constructor(payload?: CommandPayload) {...}

  get id(): number {...}

  get payload(): CommandPayload {...}

  set payload(value: CommandPayload) {...}

  get method(): any {...}

  set method(value: any) {...}

  set gateway(value: Gateway) {...}

  get mimeType() {
    return this._payload.mimeType;
  }

  concat(command: Command): void {
    this._payload.concat(command.payload);
  }

  serialize(): string | Blob | ArrayBuffer {
    return this._payload.serialize();
  }

  parse(response: any): any {
    return this._payload.parse(response);
  }

  invoke(context?: Command): Observable<CommandResult> {
    context = context || this;
    context.state = CommandState.EXECUTING;
    let result = Observable.create((observer: Observer<CommandResult>) => {
      this._gateway.send(context).subscribe((response: Observer<any>) => {
        context.state = CommandState.INVOKED;
        observer.next({
          command: context,
          payload: context.parse(response)
        });
      }, (error: any) => observer.error(context.parse(error)),
        () => observer.complete());
    });
    return result;
  }

  set state(value: CommandState) {...}

  get state(): CommandState {...}
}
The _payload of the command is the piece of data that holds the information that the command sends through the network. Since the payload of the command is the only thing which knows how the data within the command is represented, the Command delegates the concat and serialize method calls to the payload itself.
The relation between Command and Payload takes advantage of the decorator pattern.
Thanks to the current architecture we can implement:
- Batching of the commands. Imagine we are using an HTTP gateway and we want to batch several commands. The async service will batch the commands depending on their corresponding actions. The actual concatenation of the commands will be implemented in the
Payloadclass. This is due the reason that JSON commands will be concatenated differently compared to BERT commands, for instance. - Prioritization. We can build a priority queue of the incoming actions and dispatch the corresponding commands based on the assigned priority. In such case higher priority commands (such as RESTful calls) can be invoked before lower priority commands (such as assets fetching) no matter of the order they arrive.
Configuration of Dependencies
Now let’s take a step back and look at the single-player component:
@Component({
  // More component-specific declarations
  providers: [
    provide(AsyncService, { multi: true, useClass: GameServer })
    //...
  ]
})
export class SinglePlayerComponent {
  // Some basic logic here
}
Inside of the providers property we define a single provider, one for the AsyncService token. This means that inside of the GameModel, requested in the GameComponent, will be injected an instance of the GameServer. But notice that we’re declaring the provider as multi-provider. Multi-providers in Angular allow us to have multiple providers associated to the same token.
In case of single-player game, once we invoke the onProgress method of the GameModel a new gameProgress action will be triggered. This action will be passed to the set of async services (_services) which will map it to commands with specific payload, and send it through the network, using specific gateway. In this case the only async service will be the GameServer.
In the multi-player screen we want to not only use the GameServer but also to send notification to the connected peer with the player’s progress. This can happen with adding a single line of code:
@Component({
  // More component-specific declarations
  providers: [
    provide(AsyncService, { multi: true, useClass: GameServer }),
    provide(AsyncService, { multi: true, useClass: GameP2PService }),
    //...
  ]
})
export class MultiPlayerComponent {
  // Some basic logic here
}
This way, when the GameModel is used in the context of the MultiPlayerComponent, it will receive two async services: GameServer and GameP2PService.
Recap
The diagram below illustrates a sample use case of the application - user registration scenario.
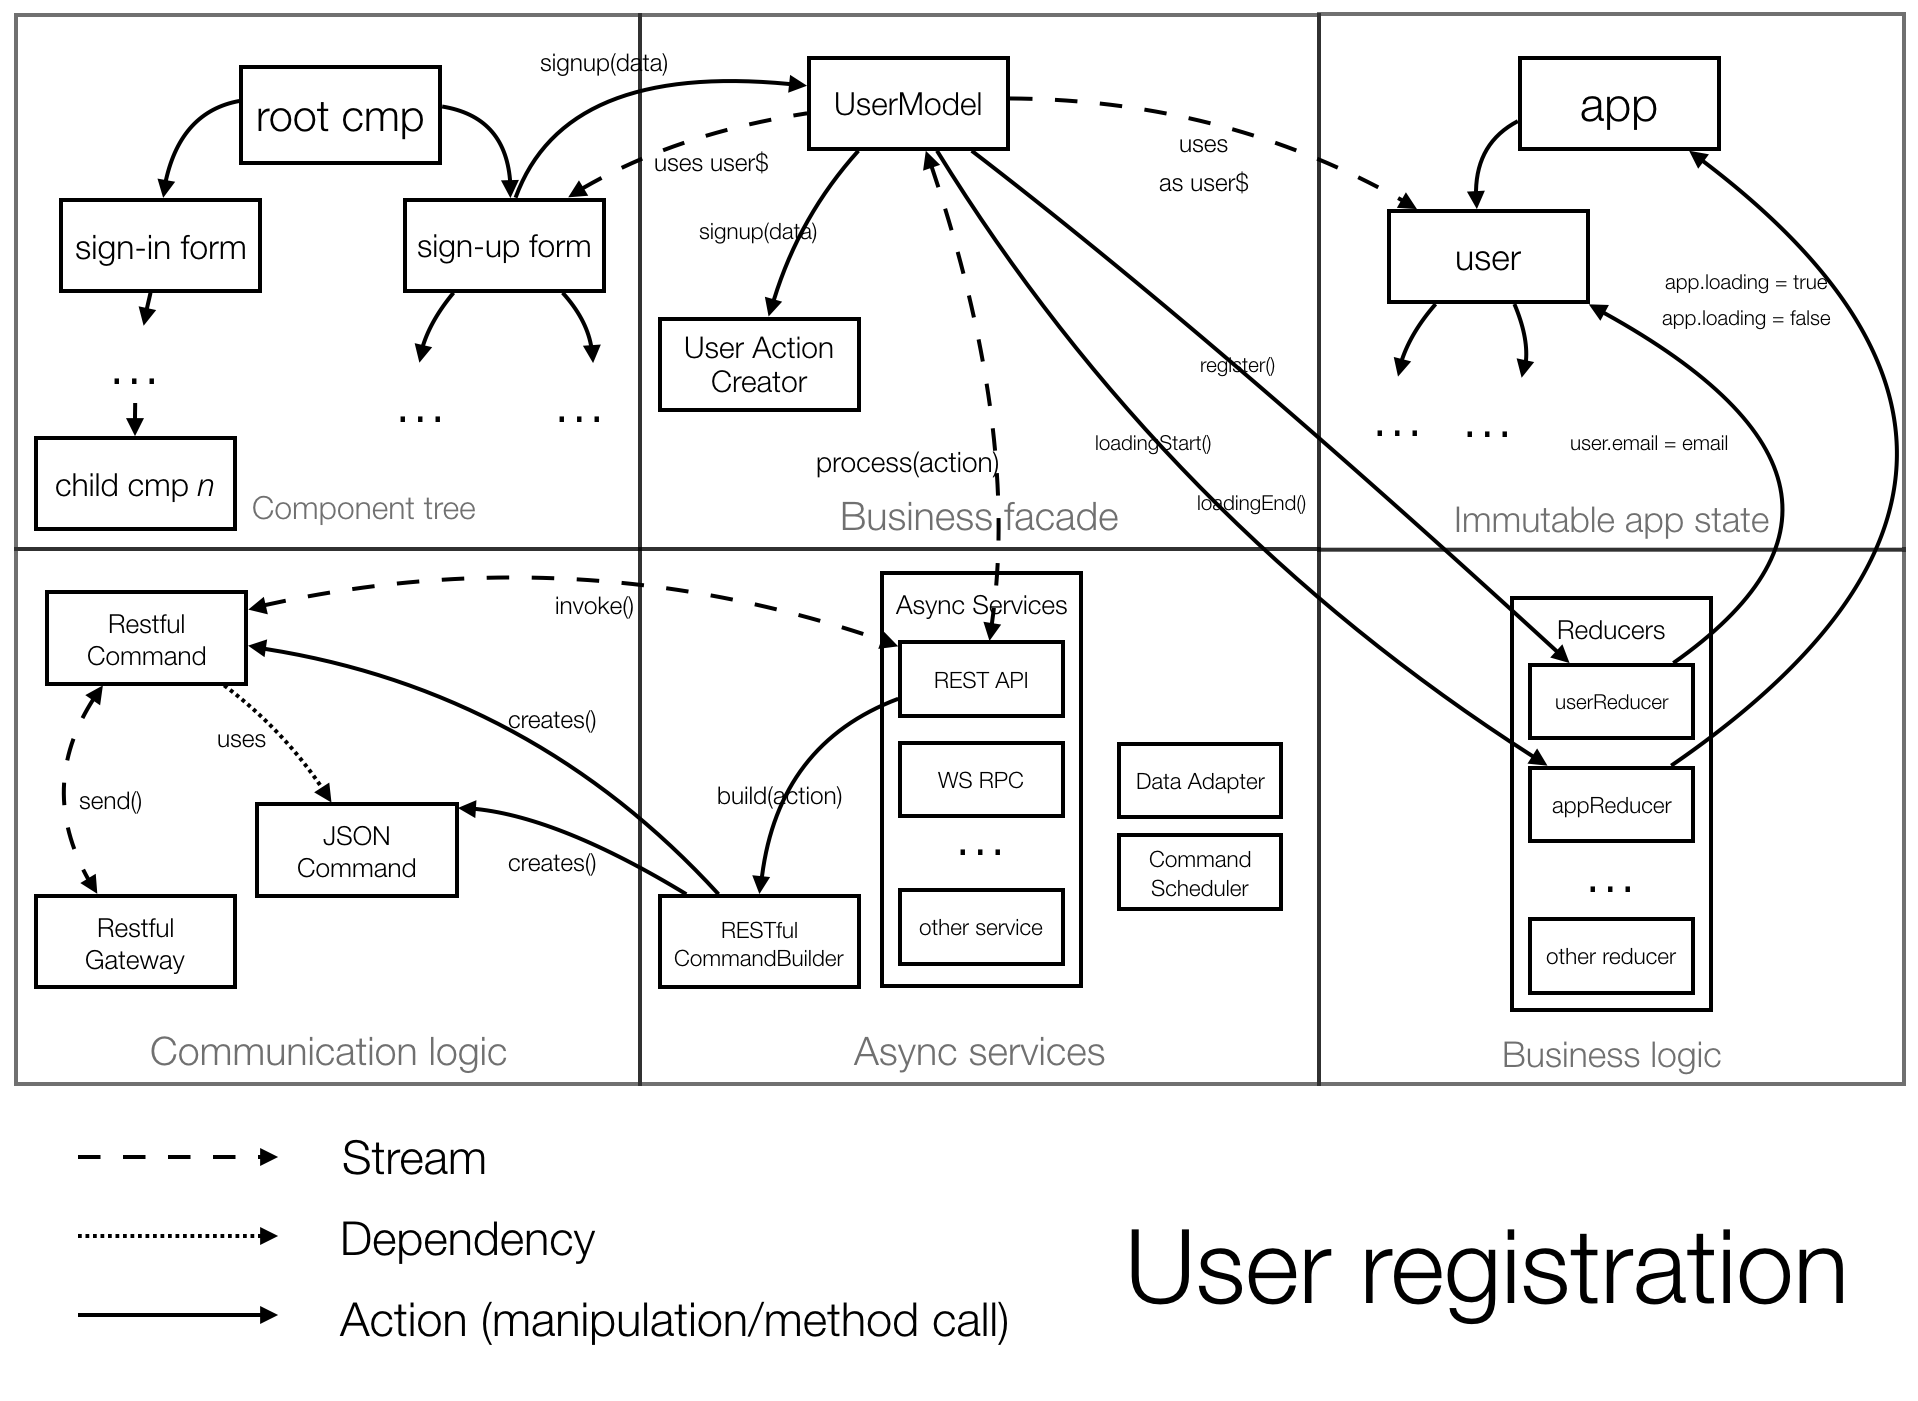
The image is divided into six different sectors:
- Component tree - encapsulates the UI related logic.
- Model - provides facade for the state management and data communication layers.
- State - immutable tree which contains the application state.
- Service layer - encapsulates the communication logic with external services.
- Communication logic - encapsulates the communication protocols and package formats of external services.
Conclusion
The proposed architecture above has the following properties:
- Predictable state management thanks to the redux-like pattern it is based on. All the gateways, models, async services, commands, payloads must be stateless.
- Testability. For resolving any of the services we’re using the dependency injection mechanism of Angular 2 so we can easily mock any of them for our testing environment. On top of that, our entire business logic is in pure functions (the reducers) which are easy to test.
- Easy for newcomers to join the project. When a developer who is not familiar with the architecture joins the team she can start developing components in the UI layer and use the facades which abstract the async services layer, and the state management. To new developers the architecture will look like traditional MVC.
- Context dependent dependencies. We can reuse the models across components since they are not dependent by the async services they use. Therefore we follow the open-closed principle by using context specific async services.
- Explicitness. The async services layer is explicit and each async service implements the action-to-command mapping by itself. Across async services we can have shared data adapters. We can also easily map service responses to our domain model representation by another set of adapters.
- Easy management of asynchronous events. Thanks to RxJS we can treat such events as streams and apply high-order functions over them.
Slides from my talk
Here you can find slides from a talk I did on this subject: