Building TypeScript Projects with Bazel
Edit · Nov 19, 2018 · 9 minutes read · Follow @mgechev
In this blog post, we’ll make a brief introduction to what Bazel is and how we can build our TypeScript projects with it. If you’re already familiar with the problems that Bazel solves, feel free to skip to the section “Building TypeScript with Bazel.” You can find the example from this blog post in my GitHub account.

Inside Google’s CI
Google manages a massive amount of source code. There are dependencies between the individual projects, for example, the user interface of Google Cloud depends on Angular & Angular Material, Angular Material depends on Angular, which depends on TypeScript.
The projects in Google use a single version for the individual libraries in the organization (including the third-party ones.) This simplifies the dependency management in the company dramatically. Another huge bonus of this convention is that an update of a library affects all the dependent projects. This way everyone can take advantage of the latest security fixes, performance improvements, and bug fixes. Following this process means that when Microsoft releases a new version of TypeScript, it gets synced inside of Google as soon as possible so that all the projects can take advantage of it. As you can imagine, changes in the type system of TypeScript may break a lot of code!
To verify that nothing broke after a dependency update, the internal CI rebuilds all the dependent projects and executes their tests. Having millions of lines of TypeScript and hundreds of thousands of TypeScript files, this process may take a while if not done right!
Often projects depend on other projects. For example, Google Cloud depends on its UI and back-end services. When we update TypeScript, we don’t want to rebuild the back-end services if they don’t rely on the language.
What’s Bazel
Google open sourced the software responsible for building most of our projects under the name Bazel. Bazel is a powerful tool which can keep track of the dependencies between different packages and build targets. For simplicity, we can think of a build target as a build rule - for example, “build a TypeScript library”; a package, on the other hand, is a directory with the files inside of it and specification of the dependencies among them. In the Google Cloud example above, Bazel will come up with a dependency graph similar to the one below:

For simplicity, we can map the boxes from the diagram to build targets. When the output of a given target changes, Bazel will calculate which other targets depend on it directly or transitively and rebuild them. In the example above, if TypeScript changes, Bazel will rebuild Angular, Angular Material, Google Cloud’s UI but it’ll leave the back-end services untouched.
Some of the cool features of Bazel are:
- It has a smart algorithm for determining the build dependencies
- Bazel is independent of the tech stack. You can build anything you want with it using the same interface. For example, there are plugins for Java, Go, TypeScript, JavaScript, and more!
Let us take a look at the first point. Based on the dependency graph of a project, Bazel determines which targets it can build in parallel. Such a feature is only possible because the individual units have well-defined inputs and outputs, and they don’t produce side effects. To some extent, we can think of them as “pure functions.” One of the benefits of such a computational model is that it’s straightforward to optimize the calculations using parallelism and caching. That’s true for Bazel as well. It can cache the produced outputs from the individual build tasks anywhere, including in the cloud.
Why does the cloud cache matter? If Bazel has built a target and cached it in the cloud, anyone can reuse it without building it from scratch! If you’re a large organization, this is quite attractive, but even small teams can take advantage of such a feature. Bazel is not coupled to any particular cloud platform, which means that you can take advantage of the remote build execution and caching in Google Cloud, Azure, AWS, or your on-premise infrastructure.
Anyway, enough abstract talking. Let’s look at a specific example!
Building TypeScript with Bazel
For this example, we’ll build a small TypeScript project to an ES5 JavaScript bundle. The project is a little programming language which has the following modules:
- Lexer - accepts a string and returns an array of tokens
- Parser - accepts an array of tokens and returns an abstract syntax tree (AST)
- Interpreter - accepts an AST and evaluates it
- Application - wires everything together - passes the program to the lexer, feeds the parser with the lexer’s output, and the interpreter with the produced AST
You can find the example here. The directory structure is as follows:
.
├── BUILD
├── WORKSPACE
├── interpreter
│   ├── BUILD
│   └── index.ts
├── lexer
│   ├── BUILD
│   └── index.ts
├── package.json
├── parser
│   ├── BUILD
│   └── index.ts
├── test.ts
└── tsconfig.json
The tree above looks like a standard TypeScript project - we have a bunch of *.ts files, package.json, and tsconfig.json. We also have WORKSPACE and four BUILD files. That’s what this blog post is all about.
First, let us look at package.json:
{
  "name": "bazel-demo",
  "license": "MIT",
  "devDependencies": {
    "@bazel/bazel": "^0.19.1",
    "@bazel/typescript": "0.21.0",
    "typescript": "^3.1.6"
  }
}
Configuring the Workspace
Our project depends on the npm packages TypeScript, Bazel, and its TypeScript rules. So far nothing new. Let us now dive into the WORKSPACE configuration file:
workspace(name = 'lang')

http_archive(
    name = "build_bazel_rules_typescript",
    url = "https://github.com/bazelbuild/rules_typescript/archive/0.21.0.zip",
    strip_prefix = "rules_typescript-0.21.0",
)

# Fetch our Bazel dependencies that aren't distributed on npm
load("@build_bazel_rules_typescript//:package.bzl", "rules_typescript_dependencies")
rules_typescript_dependencies()

# Setup TypeScript toolchain
load("@build_bazel_rules_typescript//:defs.bzl", "ts_setup_workspace")
ts_setup_workspace()

# Setup the Node.js toolchain
load("@build_bazel_rules_nodejs//:defs.bzl", "node_repositories", "yarn_install")
node_repositories()

# Setup Bazel managed npm dependencies with the `yarn_install` rule.
yarn_install(
  name = "npm",
  package_json = "//:package.json",
  yarn_lock = "//:yarn.lock",
)
The file above uses a language called Starlark, you can think of it as a subset of Python. Here’s what we declare:
- The name of the workspace is
lang - We use the Bazel’s TypeScript rules. Keep in mind that they have to be the same version as the ones declared in
package.json - As the next step, we fetch Bazel’s dependencies from
build_bazel_rules_typescript - We set up the TypeScript workspace
- We set up the Bazel’s Node.js toolchain. It consists of a bunch of tools developed by the Bazel team so that we can use Node.js with Bazel
- Finally, we declare a rule which lets Bazel manage our npm dependencies
Don’t worry if it the snippet above doesn’t look obvious. You can think of the load invocations as a require in Node.js with the difference that Bazel can fetch the dependencies from the network.
Configuring the Targets
We’re going to go on a very granular level. We can directly map the individual modules of the project to separate Bazel packages, and in each package, we’ll define a target. As we mentioned above, we can think of the packages as directories and their corresponding files and the targets as build rules.
Each directory has a BUILD file (or BUILD.bzl if you prefer). Let us take a look at the BUILD file in the root of the project:
package(default_visibility = ["//visibility:public"])

load("@build_bazel_rules_typescript//:defs.bzl", "ts_library")

ts_library(
  name = "app",
  srcs = ["test.ts"],
  deps = ["//lexer", "//parser", "//interpreter"],
)

load("@build_bazel_rules_nodejs//:defs.bzl", "rollup_bundle")

rollup_bundle(
  name = "bundle",
  entry_point = "test.js",
  deps = [":app"],
)
Above we first set the visibility of this package to the public, and after that, load two Bazel rules:
ts_library- we use it to build the TypeScript filesrollup_bundle- internally invokes Rollup.js to combine the individual modules into a single file
The ts_library rule we use to build the app target. The app target represents our programming language which wires the individual modules together. It depends on the lexer, parser, and the interpreter. In the directories of these modules, we have BUILD files with similar content. For example, the parser’s content looks as follows:
package(default_visibility = ["//visibility:public"])

load("@build_bazel_rules_typescript//:defs.bzl", "ts_library")

ts_library(
    name = "parser",
    srcs = glob(["*.ts"]),
    deps = ["//lexer"],
)
This time we use a glob to indicate the source files. Also, notice that the parser depends only on the lexer.
Having a lot of targets with many dependencies may get confusing. A neat feature of Bazel is that the dependency graph is statically analyzable! We can directly query the dependency graph using Bazel’s query language. Let us go one step further and directly visualize it!
First, run yarn to install all the dependencies from package.json so that we can get the Bazel’s binary:
yarn
Now run (you may need to install graphviz before that):
./node_modules/.bin/bazel query --output=graph ... | dot -Tpng > graph.png
The output of the command looks as follows:
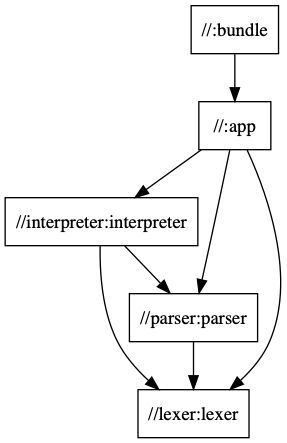
We can see the dependencies between the individual targets - :bundle depends on the :app target, which depends on the :interpreter, :parser, and the :lexer. The output //parser:parser means “the target :parser from the package //parser.
Now we’re ready to build the project! Run:
./node_modules/.bin/bazel build :bundle
The first invocation of the command above may take some time because Bazel will load the dependencies of the workspace when it needs them. Each subsequent invocation should be instantaneous.
Now let us verify that everything works as expected by executing the produced bundle:
node bazel-bin/bundle.js
43
bazel.rc.
Watch Mode
How about watching the files of the project and rebuilding on change? For the purpose, we need to install @bazel/ibazel and run:
# Don’t forget yarn add -D @bazel/ibazel
./node_modules/.bin/ibazel build :app
With both ibazel and bazel we’ll rebuild given target only when any of its direct or transitive dependencies change.
ibazel example above we build the :app target. This is because we wouldn’t be able to demonstrate incrementality with the :bundle target since at the time of writing the Rollup.js rule for Bazel is still under active development.
Let us now create some shortcuts so that we don’t directly invoke ./node_modules/.bin/bazel or ./node_modules/.bin/ibazel every time:
Update package.json and add the following two scripts:
{
  "name": "bazel-demo",
  "license": "MIT",
  "scripts": {
    "build": "bazel build :bundle",
    "watch": "ibazel build :app"
  },
  "devDependencies": {
    "@bazel/bazel": "^0.19.1",
    "@bazel/typescript": "0.21.0",
    "typescript": "^3.1.6"
  }
}
Now with yarn build we’ll rebuild the project and with yarn watch we’ll watch and rebuild the targets on change.
Conclusion
In this blog post, we looked at Google’s build system Bazel. We explained some of the problems that Bazel solves to provide fast and scalable build solution.
In the second part of the post, we looked at a sample build setup for a small TypeScript project, where we compile a bunch of files and bundle them with Rollup.js. In the process, we explained what a workspace, a build target, package, and how we can configure them.
At this point, we saw one of the core strengths of Bazel - static dependency graph which allows neat optimizations such as caching and parallelism. Be tuned for the next post in which we’ll take a closer look at the performance implications.