Implementing Angular's Dependency Injection in React. Understanding Element Injectors.
Edit · Jan 30, 2017 · 15 minutes read · Follow @mgechev
Recently I’ve been blogging mostly about Angular and it’s not by accident! Angular is an amazing framework, bringing a lot of innovation to the front-end technologies, with a great community behind it. In the same time, the projects that I’m working on have various of different requirements and sometimes I need to consider different options.
Another great technology that I’ve used in the past is React. I don’t want to compare it with Angular; I’m sure there are variety of cases when one of them fits better compared to the other and visa versa. I respect the philosophy of both Angular and React, and I love seeing how they move Web forward!
This blog post is related to a fun experiment I did recently - implement Angular’s dependency injection mechanism in React. A demo which contains the fork of react-dom, could be found at my GitHub account.

Disclaimer
With the following post I’m not implying that using Angular’s DI in React is either a good or a bad idea; this completely depends on the style of programming which works best for you. The example here is not something I use in production, and I would not recommend you to do so because it is not well tested and directly modifies React’s internals.
Finally, I’m not implying that the Angular’s dependency injection is the only approach we can apply to write well decoupled code, or even that we need the object-oriented paradigm for that. We can write high-quality code in any paradigm and any framework if we put enough effort in the design process.
This post is based on a small experiment I did during my rainy Sunday evening. The post is with learning purpose only. It can help you understand how dependency injection can be used in the development of modern user interface*, end eventually, give you some insight into the React’s and Angular’s internals.*
Introduction to dependency injection
If you’re already familiar with dependency injection as a concep, and how it can be used, you can directly skip to “Element injectors”.
Dependency injection (DI) is a powerful tool which brings a lot of benefits. For instance, DI helps with following the Single Responsibility Principle (SRP), by not coupling given entity with the logic for the instantiation of its dependencies. Open/Closed Principle is another place where DI rocks! We can make given class dependant only on abstract interfaces and by configuring its injector we can pass different implementations of the abstractions.
Next, lets take a look at what the Dependency Inversion Principle states:
A. High-level modules should not depend on low-level modules. Both should depend on abstractions.
B. Abstractions should not depend on details. Details should depend on abstractions.
Although DI does not directly enforces it, it can predispose us to write code which follows the principle.
A few days ago I published a library called injection-js. It is an extraction of the Angular’s dependency injection mechanism. Thanks to the fact that injection-js comes from the Angular’s source code, it’s well tested and mature, so you can give it a try!
$ npm i injection-js --save
Using dependency injection
Now, lets see how we can use the library! But before that, lets get familiar with the core concepts behind it. In the root of the dependency injection mechanism of injection-js (and respectively Angular) is the injector. It is responsible for holding different “recipes” for instantiation of the individual dependencies. These recipes are called providers. To each provider we have an associated token. We can think of the tokens as identifiers of the individual dependencies and providers (we have 1:1 mapping, or bijection, between providers and dependencies). We ask the injector for an instance of any of the dependencies by using its token.
Here’s an example:
// We can use the same imports from '@angular/core'.
import { ReflectiveInjector, Injectable } from 'injection-js';

class Http {}

@Injectable()
class UserService {
  constructor(private http: Http) {}
}

const injector = ReflectiveInjector.resolveAndCreate([
  { provide: Http, useClass: Http },
  { provide: UserService, useClass: UserService },
]);

injector.get(UserService);
The following examples use injection-js but we can use @angular/core the same way. Above we import ReflectiveInjector and @Injectable. ReflectiveInjector has a factory method called resolveAndCreate which allows us to create an injector by passing a set of providers. In this case we pass providers for the classes Http and UserService.
We declare the token associated with given provider by setting the value of its provide property. Above we instruct the injector to instantiate the individual dependencies by directly invoking their constructor. This means that, if we want to get an instance of Http, the injector will return new Http(). If we want to get a UserService, the injector will peek at the parameters of its constructor and first create an instance of Http (or use an existing one if it’s already available). After that it can invoke the constructor of UserService with the already existing instance of Http.
Finally, the decorator @Injectable doesn’t do anything. It just forces TypeScript to generate metadata regarding the types of the dependencies that UserService accepts.
Note that in order to make TypeScript generate such metadata, we need to set the emitDecoratorMetadata property in tsconfig.json to true.
Since the syntax for configuring the injector looks a bit redundant, we can use the following definition of the providers instead:
const injector = ReflectiveInjector.resolveAndCreate([
  Http, UserService
]);
In some cases, the dependencies that we want to declare are simply values which need to be injected. For example, if we want to inject a constant, it is not convenient as token to use the constructor of the constant. In this case we can set the token to any other value - remember - the token is nothing more than an identifier:
const BUFFER_SIZE = 'buffer-size';

const injector = ReflectiveInjector.resolveAndCreate([
  Socket,
  { provide: BUFFER_SIZE, useValue: 42 }
]);
In the example above, we create a provider for the BUFFER_SIZE token. We declare that once the token BUFFER_SIZE is required we want the injector to return the value 42. Here’s an example:
injector.get(BUFFER_SIZE); // 42
There are two more details in the example above:
- What if we have name collision with another token called
buffer-size? - How do we declare that given class accepts the
BUFFER_SIZEsize as dependency if it’s not a type?
We can handle the first problem by using OpaqueToken. This way our BUFFER_SIZE definition will be:
const BUFFER_SIZE = new OpaqueToken('BufferSize');
The instances of the class OpaqueToken are uniques values which are used by the DI mechanism of Angular to represent tokens in cases when we cannot use a type.
For the second problem, we can require a dependency whose token is not a type by using the @Inject parameter decorator of Angular/injection-js:
const BUFFER_SIZE = new OpaqueToken('BufferSize');

class Socket {
  constructor(@Inject(BUFFER_SIZE) public size: number) {}
}

const injector = ReflectiveInjector.resolveAndCreate([
  Socket,
  { provide: BUFFER_SIZE, useValue: 42 }
]);

injector.get(Socket).size; // 42
Hierarchy of injectors
In AngularJS all the providers were stored into a flat structure. A big improvement in the dependency injection mechanism of Angular 2 and above, is that we can build a hierarchical structure of injectors. For instance, lets take a look at the image below:
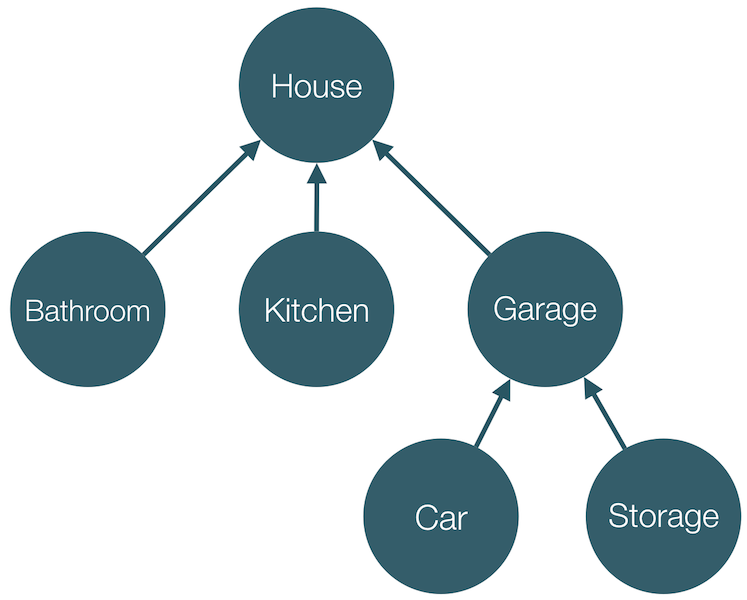
We have a root injector called House, which is parent of the injectors Bathroom, Kitchen and Garage. Garage is parent of Car and Storage. If we require the dependency with token tire, for instance, from the injector Storage, Storage will try to find it in its set of registered providers. If it doesn’t find it there, it’ll look into Garage. If it is not there, Garage will look in House. In case House finds the dependency it will return it to Garage which will give it back to Storage.
Does the tree above look familiar? Well, recently most frameworks for building user interface structure it as a tree of components. This means that we can have a tree of injectors which are responsible for the instantiation of the individual components and their dependencies. Such injectors Angular calls element injectors.
Element injectors
Lets take a brief look at how element injectors looks like in Angular. We’re going to reuse the same model in our React implementation so lets explore a simple example:
Suppose we have a game which has two modes:
- Single-player mode.
- Multi-player mode.
When a user plays the game in a single-player mode, we want to send some metadata to our application server through a Web Socket. However, if our user plays against another player, we want to establish a WebRTC data channel between both players in order to synchronize the game. Of course, it makes sense to send data to the application server as well. With Angular/injection-js we can handle this with multi-providers, but for the sake of simplicity lets suppose that for multi-player we want only p2p connection.
So, we have our DataChannel, which is an abstract class with a single method and an observable:
abstract class DataChannel {
  dataStream: Observable<string>;
  abstract send(data: string);
}
Later, this abstract class can be implemented by the classes WebRTCDataChannel and WebSocketDataChannel. Respectively, the SinglePlayerGameComponent will use the WebSocketDataChannel and MultiPlayerGameComponent will use the WebRTCDataChannel. But what about the GameComponent? GameComponent can depend on DataChannel. This way, depending on the context it’s used in, its associated element injector can pass the correct implementation, configured by its parent component. We can take a look at how this looks in Angular, with the following snippet in pseudo code:
@Component({
  selector: 'game-cmp',
  template: '...'
})
class GameComponent {
  constructor(private channel: DataChannel) { ... }
  ...
}

@Component({
  selector: 'single-player',
  providers: [
    { provide: DataChannel, useClass: WebSocketDataChannel }
  ],
  template: '<game-cmp></game-cmp>'
})
class SinglePlayerGameComponent { ... }


@Component({
  selector: 'multi-player',
  providers: [
    { provide: DataChannel, useClass: WebRTCDataChannel }
  ],
  template: '<game-cmp></game-cmp>'
})
class MultiPlayerGameComponent { ... }
In the example above we have the declaration of the GameComponent, SinglePlayerGameComponent and MultiPlayerGameComponent. GameComponent has a single dependency of type DataChannel (we don’t need the @Injectable decorator since @Component already forces TypeScript to generate metadata). Later in SinglePlayerGameComponent we associate the class WebSocketDataChannel with the token of the dependency that GameComponent accepts (i.e. DataChannel). Finally, in MultiPlayerGameComponent we associate DataChannel with WebRTCDataChannel.
What will happen behind the scene is shown on the image below:
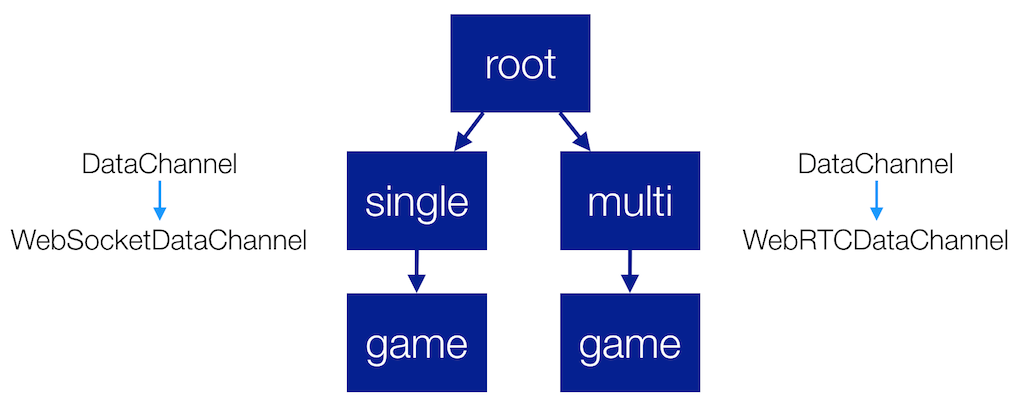
The element injectors of SinglePlayerGameComponent and MultiPlayerGameComponent will have a parent injector. For simplicity, lets suppose both have the same parent since this is not interesting for our discussion. SinglePlayerGameComponent will register a provider which will associate the DataChannel token with the WebSocketDataChannel class. This provider, together with a provider for the SinglePlayerGameComponent component will be registered into the injector shown on the diagram as single (Angular registers more providers in the element injectors but we can ignore them for simplicity).
On the other hand, in the multi injector from the diagram we will have registration of a provider for the MultiPlayerGameComponent and a provider which associates DataChannel with WebRTCDataChannel.
Finally, we have two game injectors. One in the context of the SinglePlayerGameComponent and one in the context of MultiPlayerGameComponent. Both game injectors will register the same set of providers but will have different parents. In this case, the only provider that we will have in game is one for the GameComponent. When we require the dependency associated with the DataChannel token from the game injector, first it’ll look into its set of registered providers. Since we don’t have a provider for DataChannel in game, it’ll ask its parent. In case the parent of game is the single injector (which will happen if we use the GameComponent as view child of the SinglePlayerGameComponent), we’ll get an instance of the WebSocketDataChannel. In case we require the dependency associated with the DataChannel token from the game injector which as parent has the multi injector, we’ll get an instance of WebRTCDataChannel.
That’s it!
Now it’s time to apply this knowledge into the context of React.
Implementing DI in React
We need to implement an Inversion of Control (IoC) for the instantiation of the components in our React application. This means that an injector should be responsible for the instantiation of the individual building blocks of the user interface. The process will go as follows:
- Each component will declare its dependencies just by specifying their type in its constructor, or by using the
@Injectparameter decorator. - We’ll create an injector for each component, and call it an element injector. This injector will be responsible for the instantiation of the corresponding component and instantiation of its dependencies (it may query its parent injector).
- Each component may declare a set of providers which will be included into its associated element injector.
- We will add a predefined set of providers for the properties that are usually positionally injected into any React component (for instance, props, context and updateQueue).
- For each nested component we set as its parent injector, the injector of its closest parent.
That’s it! Now lets implement it.
Declaring component’s providers
In order to declare the providers for given component we will use approach similar to the one used in Angular. Angular’s components declare their providers as value of the providers property of the object literal passed to the @Component decorator:
@Component({
  selector: 'foo-bar',
  providers: [Provider1, Provider2, ..., ProviderN]
})
class Component {...}
We will declare a class decorator called @ProviderConfig which using the ES6 Reflect API associates the providers to the corresponding component.
export function ProviderConfig(config: any[]) {
  return function (target: any) {
    Reflect.set(target, 'providers', config);
    return target;
  };
};
The decorator can be used as follows:
@ProviderConfig([ Provider1, Provider2, ..., ProviderN ])
class Component extends React.Component {
  ...
}
Creating element injectors
The purpose of this section is to apply the points listed in the previous section with minimum amount of changes in the React’s code. Furthermore, the modifications should be as isolated as possible in order to be possible to distribute them as separate module, which allows using React with injection-js. Finally, the implementation is not complete, it ignores the case of factory components. Supporting factory components is possible but not necessary for the purpose of the post.
Internally, React wraps each component, together with a bunch of other stuff, into ReactElements. Later, it uses the individual ReactElements in order to create the specific component instances.
These two happen in the following files (we’ll explore only react-dom, ignoring other platforms):
react/lib/ReactElement.js- contains the factory method used for instantiation ofReactElements (createElement).react-dom/lib/ReactCompositeComponent.js- contains the method used for construction of the components.
For our purpose, we’ll make a few modifications only in the react-dom/lib/ReactCompositeComponent.js. Lets explore it!
require('reflect-metadata');
var ReflectiveInjector = require('injection-js').ReflectiveInjector;

...

_constructComponentWithoutOwner: function (doConstruct, publicProps, publicContext, updateQueue) {
  var Component = this._currentElement.type;
  var providers = [
    Component, {
      provide: 'props',
      useValue: publicProps
    }, {
      provide: 'context',
      useValue: publicContext
    }, {
      provide: 'update',
      useValue: updateQueue
    }
  ].concat(Reflect.get(Component, 'providers') || []);
  var injector;
  if (!this._currentElement._owner) {
    injector = ReflectiveInjector.resolveAndCreate(providers);
  } else {
    injector = Reflect.get(this._currentElement._owner._currentElement.type, 'injector').resolveAndCreateChild(providers);
  }
  Reflect.set(Component, 'injector', injector);

  if (doConstruct) {
    if (process.env.NODE_ENV !== 'production') {
      return measureLifeCyclePerf(function () {
        return injector.get(Component);
      }, this._debugID, 'ctor');
    } else {
      return injector.get(Component);
    }
  }
  ...
This is fork of React 15.4.2. The code above shows all the modifications that I had to do in order to create an injector for each component, and later instantiate the component with the corresponding injector. Lets explore the snippet step by step.
First, we get reference to the component’s class. This happens by getting the value of the property this._currentElement.type. Later we register a set of providers. The default set contains the component’s class, providers for props, context and updateQueue. The last three providers are by default passed to the constructor of each component during instantiation. Later to this set of providers we also add the providers declared with @ProviderConfig. For this purpose we use the ES6 Reflect API.
As next step we check if the element of the current component has an owner. If it doesn’t, this means that we’re at the root component and we need to create the root injector. For this purpose we use the static resolveAndCreate method of the ReflectiveInjector class. In case the current element has an owner, we instantiate a child injector by invoking the resolveAndCreateChild of the owner’s injector.
Since we want the created injector to be available for child components, we keep it as an entry in the Reflect API.
Finally, we instantiate the component by invoking the get method of the current injector with a reference to the component’s class as first argument.
Note that this code manipulates React’s internals and uses private properties, prefixed with _! I don’t recommend it for production usage because it is not well tested, doesn’t cover factory components and most likely won’t work in future releases of React.
Using React with DI
Here’s a quick demo which illustrates how we can use DI in React with the described implementation:
import * as React from 'react';
import {Inject} from 'injection-js';
import {ProviderConfig} from '../providers';
import {WebSocketService} from '../websocket.service';

@ProviderConfig([ WebSocketService ])
export default class HelloWorldComponent extends React.Component<any, any> {
  constructor(@Inject('update') update, ws: WebSocketService, @Inject('props') props: any) {
    super(props);
  }

  render(){
    return <div>Hello world!</div>;
  }
}
There’s one important difference between how we use components with DI enabled, compared to the traditional approach - the parameters that the target component accepts are not injected positionally but instead based on the order they are declared in the constructor.
As we can see from the example above, HelloWorldComponent accepts tree arguments, all of them are injected through the DI mechanism of injection-js. In contrast to the original component API, the dependencies are going to be injected with the order of their declaration.
Conclusion
In this experiment we saw how we can use the dependency injection mechanism of Angular in React. We explained what DI is and what benefits it brings. We also saw how we apply it in the context of the development of user interface by using element injectors.
Right after that, we went through a possible implementation of the element injectors in React by directly modifying the library’s source code.
Although the idea seems interesting, and possibly applicable in real-world applications, the example for the article is not production ready. I’d appreciate your feedback and ideas in the comments section below.