Understanding Dynamic Scoping and TemplateRef
Edit · Oct 1, 2017 · 10 minutes read · Follow @mgechev
This post will be dedicated to template references in Angular and dynamic scoping. Although the main focus of the article will be understanding TemplateRef we will also touch semantics of programming languages by introducing the concept of scope of name binding.
The code samples for this article can be found in my GitHub account.
Introducing Template References
In order to understand TemplateRef lets take a look at the NgForOf directive. Suppose we have a list of puppies and we want to iterate over it in the PuppyListComponent. The Puppy interface will look like this:
interface Puppy {
  name: string;
  photo: string;
  age: number;
  breed: string;
}
Here’s a sample implementation of the PuppyListComponent:
@Component({
  selector: 'puppy-list',
  template: `
  <md-list>
    <md-list-item *ngFor="let puppy of puppies">
      <img mdListAvatar [src]="puppy.photo" alt="...">
      <h3 mdLine> {{puppy.name}} </h3>
      <p mdLine>
        <span>Age: {{puppy.age}} </span>
        <span>Breed: {{puppy.breed}} </span>
      </p>
    </md-list-item>
  </md-list>
  `
})
export class PuppyListComponent {
  @Input() puppies: Puppy[];
}
In the snippet above we define a component with an input called puppies. Inside of the component’s template we iterate over the individual puppies and visualize them on the screen. For this purpose we use the *ngFor directive.
We will refer to directives and components by using their controller names or their selectors.
Later, we can use the component in the following way:
@Component({
  selector: 'puppies-cmp',
  template: `
    <puppy-list [puppies]="puppies"></puppy-list>
  `
})
class PuppiesComponent {
  puppies = [
    { name: 'Dino', age: 1, photo: '...', breed: 'Rottweiler' },
    { name: 'Max', age: 2, photo: '...', breed: 'Beagle' },
    { name: 'Lucy', age: 1, photo: '...', breed: 'Golden Retriever' }
  ];
}
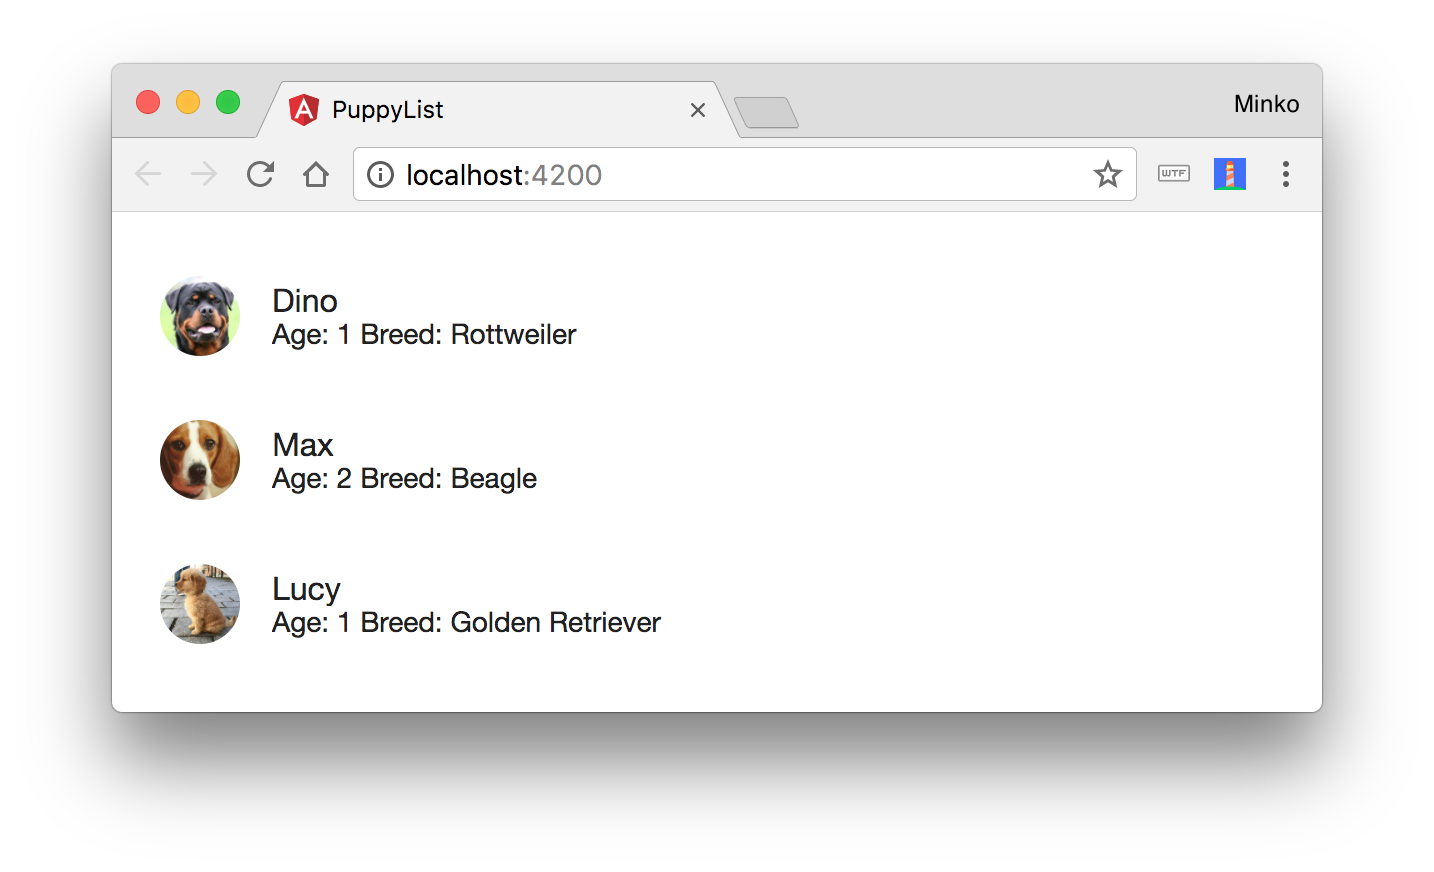
In the PuppiesComponent we declare the individual puppies and pass them as an input to the puppy-list. Now our application looks like this:
Template Directives
Lets take a step back and look at the PuppyListComponent template again:
@Component({
  // ...
  template: `
  <md-list>
    <md-list-item *ngFor="let puppy of puppies">
      ...
    </md-list-item>
  </md-list>
  `
})
export class PuppyListComponent {...}
It’s important to notice that this template is equivalent to:
@Component({
  // ...
  template: `
  <md-list>
    <ng-template ngFor let-puppy [ngForOf]="puppies">
      <md-list-item>
        ...
      </md-list-item>
    </ng-template>
  </md-list>
  `
})
export class PuppyListComponent {...}
The only difference from the previous example is that instead of placing the *ngFor directive on the md-list-item component, we create a template element with the attributes ngFor, let-puppy and [ngForOf]="puppies". The meaning of the attributes on the ng-template element is as follows:
ngFor- hints Angular that we use theNgForOfdirective here.let-puppy- creates a new local variable for the template that we can create bindings to. This way we can reference the individualpuppiesvia thepuppyvariable. We will explain thelet-attribute in details later in the article.[ngForOf]- points the collection we are going to iterate over.
In fact, each time Angular sees an attribute prefixed with a * it will desugar the markup to ng-template. That’s what we call a template directive. By default Angular will use the markup between the opening and closing ng-template tags as template for the template directive itself. There are a few template directives that Angular provides, for instance:
NgForOf- allows us to iterate over a collection.NgIf- conditionally includes a template based on the value of an expression.NgSwitch- adds / removes DOM sub-trees when the nest match expressions matches the switch expression.- etc.
All of them use TemplateRefs internally. We can develop custom template directives as well but that’s a topic of another discussion.
Now, lets suppose we want to define a different page in our application which again, iterates over the individual puppies but this time visualizes them differently. An obvious implementation strategy for such component is to copy the PuppyListComponent and after that update it’s template accordingly in order to align to the requirements of the new layout. Angular, however, allows us to approach more elegantly to the problem.
Passing a Custom TemplateRef
Now, instead of placing the *ngFor directive directly on top of the md-list-item component, lets use an ng-template element and inject the template that NgForOf will use from the outside:
<ng-template ngFor let-puppy [ngForOf]="puppies" [ngForTemplate]="puppyTemplate">
</ng-template>
The only difference from the last snippet is that we explicitly pass the template that Angular will use to render the individual puppies. For the purpose we use the ngForTemplate input of the NgForOf directive. It’s interesting to point out that we can pass TemplateRefs as inputs. In contrast to this, in the initial example Angular would use the markup which is between the opening and closing ng-template tags.
Angular will get the template for NgForOf from the value of the puppyTemplate property declared in the controller of the PuppyListComponent. This will change the definition of PuppyListComponent to:
import { Puppy } from './../puppy/puppy';
import { Component, Input, TemplateRef, ContentChild } from '@angular/core';
import { NgForOfContext } from '@angular/common';

@Component({
  selector: 'puppy-list',
  template: `
  <md-list>
    <ng-template ngFor let-puppy [ngForOf]="puppies" [ngForTemplate]="puppyTemplate">
    </ng-template>
  </md-list>
  `
})
export class PuppyListComponent {
  @Input() puppies: Puppy[];

  @ContentChild(TemplateRef) puppyTemplate: TemplateRef<NgForOfContext<Puppy>>;
}
Now things are getting interesting. Notice that in the class definition we have decorated the puppyTemplate property with the @ContentChild decorator and we pass TemplateRef as its argument. This argument is a selector that Angular will match against the content children of the given component (more about content and view children can be found here). The type of the puppyTemplate property is TemplateRef<NgForOfContext<Puppy>> we’ll explain this in details in the final section of this article.
In short, this means that Angular will get the template reference, that NgForOf will use, as content child passed to the PuppyListComponent from its parent.
Now, lets see how the template of the parent component needs to be changed in order to reflect the update:
@Component({
  selector: 'app-root',
  template: `
    <puppy-list [puppies]="puppies">
      <ng-template let-puppy>
        <md-list-item>
          <img mdListAvatar [src]="puppy.photo" alt="...">
          <h3 mdLine> {{puppy.name}} </h3>
          <p mdLine>
            <span>Age: {{puppy.age}} </span>
            <span>Breed: {{puppy.breed}} </span>
          </p>
        </md-list-item>
      </ng-template>
    </puppy-list>
  `
})
export class PuppiesComponent {
  // ...
}
Notice how as content child of the puppy-list element we pass an ng-template element. This ng-template element will become the value of the puppyTemplate declared inside of the PuppyListComponent.
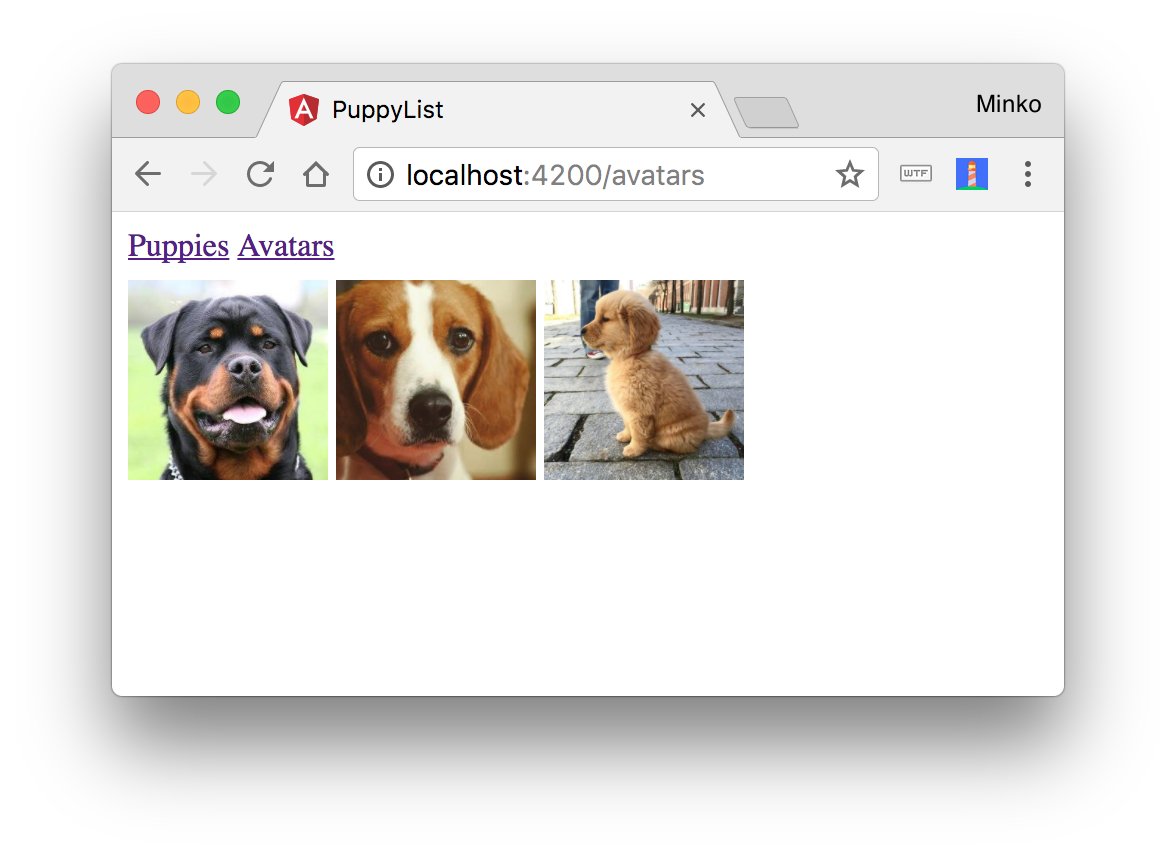
Now if in another component, lets say, PuppyAvatarsComponent, we want to show only the avatars, we can do that by reusing the PuppyListComponent:
import { Component } from '@angular/core';

@Component({
  selector: 'puppy-avatars',
  template: `
    <puppy-list [puppies]="puppies">
      <ng-template let-puppy>
        <img mdListAvatar [src]="puppy.photo" alt="...">
      </ng-template>
    </puppy-list>
  `,
  // ...
})
export class PuppyAvatarsComponent {
  // ...
}
This way we just pass a reference to a different template. In this template instead of showing detailed information about the individual puppies we just visualize their avatars.
Here’s how this layout is going to look like:
Introducing Dynamic Scoping
In programming languages there are two main scopes of name bindings:
- Lexical scoping.
- Dynamic scoping.
You might have heard about the first one from JavaScript - with var we can declare variables with functional lexical scope, compared to let where the variables are with block lexical scope.
This simply means that in the following case, the variable foo will be visible within the entire function (functional lexical scope):
function baz() {
  if (bar) {
    var foo = 42;
  }
  // 42
  console.log(foo);
}
…compared to this snippet (block lexical scope), where the variable will be visible only inside of the if-statement’s block:
function baz() {
  if (bar) {
    let foo = 42;
  }
  // undefined
  console.log(foo);
}
Both, lexical and dynamic scoping, address the “scope” of a variable declaration and both of them refer to it as “the place of the program where given variable is visible”, however, we can refer to “place of the program” as both - location in the source code or location at runtime.
Lets take a look at an example:
let bar = 42;

function foo() {
  console.log(bar);
}

function baz(cb) {
  let bar = 1.618;
  cb();
}
In this case, since we have lexical scoping in JavaScript once we invoke baz(foo) we’ll get 42 printed on the screen. However, if JavaScript was language with dynamic scoping, the result was going to be 1.618.
In contrast to JavaScript, Angular’s template references use dynamic scoping. Lets take a look why!
Dynamic Scoping in Angular
Here’s our PuppyAvatarComponent:
import { Component } from '@angular/core';

@Component({
  selector: 'puppy-avatars',
  template: `
    <puppy-list [puppies]="puppies">
      <ng-template let-puppy>
        <img mdListAvatar [src]="puppy.photo" alt="...">
      </ng-template>
    </puppy-list>
  `,
  // ...
})
export class PuppyAvatarsComponent {
  // ...
}
As you may already know, the NgForOf directive provides a few more properties such as:
index- the index of the current element.odd- whether the current index is an odd number.even- whether the current index is an even number.first- has valuetrueif that’s the first item from the collection, has valuefalseotherwise.last- has valuetrueif that’s the last item from the collection, has valuefalseotherwise.
If we want to get the value of any of these properties all we need to do is declare a variable in our template:
import { Component } from '@angular/core';

@Component({
  selector: 'puppy-avatars',
  template: `
    <puppy-list [puppies]="puppies">
      <ng-template let-puppy let-odd="odd" let-f="first">
        ...
      </ng-template>
    </puppy-list>
  `,
  // ...
})
export class PuppyAvatarsComponent {
  // ...
}
With let-odd="odd" we set the value of the odd variable in the template to the value of the odd variable from the NgForOf directive and with let-f="first" we set the value of the f variable in the template to the value of the first variable from the NgForOf directive.
You might be wondering, what about let-puppy? What’s the magic which happens there and why we don’t specify what variable from the NgForOf directive we want to get its value from? In fact, NgForOf has one more property called $implicit. This property is assigned to all the template variables which we declare with attributes with no value. So if we have:
<ng-template let-puppy let-dog let-odd="odd" let-f="first">
</ng-template>
- Both
puppyanddogwill point to the current item we’re iterating over (i.e.$implicit) oddwill point to theoddproperty ofNgForOf.fwill point to thefirstproperty ofNgForOf.
Now, in order to be more precise - odd, even, first, last and $implicit are not properties of NgForOf itself but instead, of its context. The implementation of NgForOfContext can be found here
Now lets go back to the PuppyListComponent:
@Component(...)
export class PuppyListComponent {
  // ...
  @ContentChild(TemplateRef) puppyTemplate: TemplateRef<NgForOfContext<Puppy>>;
}
Notice the type of the puppyTemplate property - TemplateRef<NgForOfContext<Puppy>>. This has the following semantics:
TemplateRefelement which should be used in context of typeNgForOfContextwhere the$implicitelement has typePuppy.
Similarly the other template directives have their own context since they use TemplateRefs which need to be interpreted in given context. For instance, NgIf’s context declared by the class:
export class NgIfContext {
  public $implicit: any = null;
  public ngIf: any = null;
}
As you can see, unlike NgForOfContext, NgIfContext doesn’t have a type parameter because there’s nothing we may want to refer to with the $implicit property.
Now, how exactly does Angular has dynamic scoping of TemplateRefs`?
Lets take a step back and look at our PuppyAvatarsComponent implementation:
@Component({
  selector: 'puppy-avatars',
  template: `
    <puppy-list [puppies]="puppies">
      <ng-template let-puppy="$implicit">
        <img mdListAvatar [src]="puppy.photo" alt="...">
      </ng-template>
    </puppy-list>
  `,
})
export class PuppyAvatarsComponent {
  puppies = Puppies;

  $implicit = {
    name: 'Danny',
    age: 12,
    breed: 'Poodle'
  }
}
Notice that in the ng-template we’ve bound to the $implicit property and in the body of the component PuppyAvatarsComponent we declare a property called $implicit. Although property named $implicit exists in the current lexical scope of the template, it’s value will be ignored and since puppy has dynamic scope and will be bound to the value of $implicit where we use it, i.e. the component with selector puppy-list.
Conclusion
With TemplateRefs Angular allows us to not only perform advanced content projection but also to reuse templates across our application.
Unlike the lexical scoping which is used in most programming languages we’re familiar with, Angular uses dynamic scoping for its template references since we’re interested in the context where given TemplateRef is used, rather than declared.