Angular in Production
Edit · Jan 17, 2017 · 19 minutes read · Follow @mgechev
In this informal essay I’ll go through a case study of my experience in using Angular (2 and above) in production.
Last April, together with a small team, we started working on an educational application; the second version of a product that I developed about 3 years ago using Angular 1.
The product targets young kids and their parents. It’s purpose is to motivate kids to learn maths by earning rewards. The application had an iOS version with hundreds of thousands of users and we wanted to provide similar experience in the browser. We bet on mobile-first approach, since we were targeting kids playing on their tablets and phones.
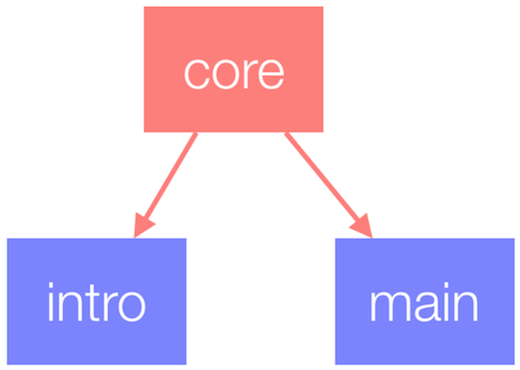
The application has two main modules:
- An intro flow which includes a few screen explaining what the application is all about, sign-in and sign-up.
- Main application which includes a quiz functionality, screen for choosing a reward, module for parent supervision, etc.
In the end because of various business reasons the project’s development was discontinued.
Choosing the tech stack
Once the entire team got familiar with the business goals and the requirements we had to choose the tech stack. Our main criteria behind it were:
- A good fit for the business goals.
- Help us to reuse previous experience we had.
- Fun to work with.
In the backend we stopped on Rails. We were considering GraphQL as a communication protocol between frontend and backend but in the end we decided to be a bit more conservative and bet on our good old friend REST. If I could go back, probably I’d choose GraphQL because I really enjoy its statically typed schema.
Going statically typed
One of the biggest flaws we experienced in the first version of the product were caused by the use of dynamically typed language. Different typos were caught after the application has been deployed to staging which made us feel the tech stack quite fragile. This prompted us consider a statically typed language for the development of the new version.
Our choice was limited to either Flow or TypeScript. Although Elm sounds hot, it was going to limit our team scalability - it’s hard to find developers with sufficient knowledge in this language.
The framework…
I had a successful experience with React in a few past projects where I used it with flux and redux. On the other hand, at this time I was contributing to the Angular’s core and a couple of other projects in the Angular organization. I was also working on angular-seed, codelyzer and writing a book about Angular. We also had another team member with experience in Angular.
Given this Angular may sound like the right solution but, on the other hand, the framework was still in beta and we knew that a lot of breaking changes are about to come.
Well, in the end we bet on Angular based on the following reasons:
- I maintain one of the most popular Angular starters. Angular Seed was already quite mature thanks to the effort that a lot of people put into it. Furthermore, for the project it was going to be good to use it in a real project and fix the flaws I find.
- From our previous experience with Angular 1, we knew that the dependency injection mechanism of the framework is something that we’re going to miss.
- Even being still in beta, Angular was providing everything we need - router, DI, change detection, view encapsulation, rendering, etc.
- It was a new, fun technology we wanted to explore in real-life projects.
Although initially we weren’t sure which statically typed dialect of JavaScript to use, Angular made the choice obvious and we bet on TypeScript. It’s unsoundness was something we weren’t really bothered about because it’s quite limited and well thought out.
If at this time I wasn’t familiar with the codebase of Angular most likely we were going to bet on React. During the implementation of our application we went through a few painful migrations and I had to fork and write custom functionality for the Angular’s router. In the end, this is the risk you take when you start using a technology in a beta version. The good thing is that once the framework got stable almost no breaking changes were introduced, although it has a decent API.
Architecture
Flux and redux, both, are architectural approaches I was really satisfied with in my past projects. On top of that, Angular plays really well with immutable data. Later, we found @ngrx/store. It’s a micro library which provides a reactive state management inspired by redux and plays really well with Angular.
In short, with @ngrx/store we can think of the redux’s store as a stream of immutable objects. Each time you emit an action which gets handled by a reducer, the new state will be emitted through a stream. The different streams can be filtered, merged, mapped, etc. in a very elegant way. On top of that, Angular provides a nice, declarative way to bind to observables using the async pipe:
@Component({
  selector: 'counter-cmp',
  template: '{{ counter | async }}'
})
class CounterComponent {
  counter = Observable.interval(1000);
}
Based on a couple of other constraints, we came up with the “Scalable Application Architecture” that I talked about on a couple of conferences. Although even now it has some edges that could be polished, the entire team was happy using it. We were able to scale the application to about 40k SLOC (source line of code) and didn’t experience any issues with state inconsistencies, neither scalability and separation of concerns.
The only drawback we experienced was that the architecture was a bit too verbose (for state change you need to define an action, action creator a model method, eventually store property). However, I’m not sure being explicit to this level is a bad thing.
Another learned lesson from our implementation is that we weren’t 100% reactive all the time. Quite often we had code like:
this.userModel
  .getUser$()
  .map(u => u.name)
  .take(1)
  .toPromise(Promise)
  .then((name: string) => {
    ...
  });
Which is quite an imperative style of programming and doesn’t always fit well in the FRP (Functional Reactive Paradigm) paradigm
Runtime performance
A serious issue that we met initially were a couple of memory leaks. Observables are awesome and you can write very elegant code with them but sometimes you forget to clean after yourself. There’s a bit of a learning curve until you get conscious and disciplined enough to start cleaning all of your subscriptions.
Some of the most painful and frustrating experiences I had were about finding leaking global event handlers. The sure thing is that you’re going to notice them. A few leaking click handlers can slow your application down dramatically. They will cause Angular to run it’s change detection mechanism over the entire component tree on each click as many times as leaking callbacks you have. This happens because zone.js monkey patches addEventListener and automatically runs dirty checking over the entire component tree (if you haven’t applied any advanced optimizations) for you.
Although it was a bit frustrating initially we were able to eliminate these problems. On top of that, both, Angular and rxjs do amazing job cleaning unused subscriptions. But it’s still worth mentioning it one more time - clean after yourself.
Optimize your bindings
Although the Angular’s change detection is really well optimized, running VM-friendly code, in a very complex user interface you may feel lag. Lets suppose we have the following component:
@Component({
  selector: 'fancy-button',
  template: '<button (click)="n++">Totally {{n}} clicks</button>'
})
class FancyButtonComponent {
  n = 0;
}
And now imagine that this component is somewhere deep into our component tree. Each time we click the button Angular has to perform change detection over all rendered components. This happens because the framework doesn’t have any guarantees that this leaf component won’t modify an object used somewhere else.
Again, the code which performs the change detection is generated by Angular and really well optimized but still, if you have bound to a computationally insensitive getter, for instance, you will feel slowdowns.
Now imagine, instead of a button we have the following input:
@Component({
  selector: 'name-input',
  template: '<input [(ngModel)]="name">'
})
class NameInputComponent {
  name: string;
}
[(ngModel)] is the so-called banana in a box syntax and allows two-way data-binding.
It is really convenient to use it, however, each character you type will trigger multiple change detection checks. If somewhere in your component tree you have:
<fib-cmp [n]="1e100"></fib-n>
@Component({
  selector: 'fib-cmp',
  template: '{{ fibonacci(n) }}'
})
class FibonacciComponent {
  @Input() n: number;

  // Unoptimized Fibonacci implementation
  fibonacci(n: number) {
    if (n === 1 || n === 2) {
      return 1;
    }
    return this.fibonacci(n - 1) + this.fibonacci(n - 2);
  }
}
You’ll feel a serious lag. Of course, we weren’t calculating the nth Fibonacci number but we had some other heavy computations.
As a learned lesson here - optimize your bindings.
Immutability is your best friend
Sometimes bindings are just heavy and we weren’t able to do anything about it. For instance, we had to show the progress for each kid, and compute it based on given formula. In the same screen we had a screen for editing the kid’s profile and a bunch of other components. Given that on each key press in an input which uses [(ngModel)] Angular performs change detection over the entire component tree, typing got really slow:

But should we go through all the kid’s performance computations in case the kid’s instance hasn’t changed? Yes, we should since we don’t know if the object we own a reference to hasn’t changed.
Fortunately, we used immutable records for representing our domain objects. Immutable records are something like immutable maps but allow to take advantage of the static typing in TypeScript. Although they are pretty cool, they are also quite verbose. For instance, our Kid domain class looks something like:
const kidRecord = Immutable.Record({
  id: null,
  name: null,
  gender: 0,
  grade: 0,
});

export interface IKid {
  id?: string;
  name?: string;
  gender?: number;
  grade?: number;
}

export class Kid extends kidRecord implements IKid {
  id: string;
  name: string;
  gender: number;
  grade: number;
  constructor(config: IKid) {
    super(config);
  }
}
This way we define:
- Immutable record with default values.
- Class which extends the immutable record and declares the properties that the kid has.
- Interface in order to be able to pass object literals as arguments to the
Kid’s constructor and have static typing.
In the end all we did in order to optimize the entire screen was:
@Component({
  selector: 'kid-statistics',
  changeDetection: ChangeDetectionStrategy.OnPush,
  template: `...`
})
class KidStatisticsComponent {
  @Input() kid: Kid;
  ...
}
This way Angular performs change detection in the component subtree with root KidStatisticsComponent only if it gets different reference to any of its inputs.
Here’s what impact this had over the application:

The lesson got from here is - perform the optimal change detection strategy.
When Immutability doesn’t help
We applied this optimization strategy wherever we could. Unfortunately, sometimes Angular was still performing unnecessary checks.

On the image above, a kid in kindergarten is solving a test. Once it answers correctly we want to increase it’s points with the result it got from the last answer. The component which animates the points increase looks something like:
@Component({
  selector: 'point-counter',
  template: '{{ boundPoints }}'
})
class PointCounterComponent implements OnChange {
  @Input() earnedPoints;
  ...

  ngOnChanges() {
    ...
    const increase = () => {
      if (currentPoints >= finalPoints) {
        this.boundPoints = finalPoints;
      } else {
        this.boundPoints += stepSize;
      }
      this.timeout = setTimeout(increase, 10);
    };
  }
}
Remember we mentioned zone.js? Zone.js monkey patches not only addEventListener but all the async APIs in the browser, including setTimeout. This means that Angular will perform change detection every 10ms and it should since we modify the boundPoints property to which we have bound in the template.
Fortunately, Angular provides us a solution. We can inject the NgZone and run the points increase animation outside the Angular’s zone which won’t trigger the change detection mechanism:
@Component({
  selector: 'point-counter',
  template: '<span #counter></span>'
})
class PointCounterComponent implements OnChange {
  ...
  constructor(private zone: NgZone) {}

  ngOnChanges() {
    ...
    this.zone.runOutsideAngular(() => {
      this.animatePoints();
    });
  }
}
However, note that in this case you have to manually manipulate the DOM. In order to keep your component decoupled from DOM you should manipulate elements indirectly using the Renderer from @angular/core.
One more problem solved. Running code outside Angular helped in this limited case but keep in mind that you should use runOutsideAngular in very rare cases since this way you’re giving up the data-binding mechanism of the framework.
Network performance
Although we experienced some issues with runtime performance, it wasn’t a big concern. Unfortunately, we noticed that a huge percentage of our users didn’t have enough patience to wait for the application to load.
Our initial production build process was to rsync the dist/prod directory produced by Angular Seed to the remote server. Although it was simple, it was far from optimal. nginx was using gzip to provide compressed content to the end users but our gzipped bundle size was still about 800k.
Later we migrated the application to RC.5 to took advantage of the Ahead-of-Time compilation. This increased our bundle size even further - now it was close to 1M. Loading the bundle was not the only problem. On low-end devices it’s parsing was taking up to a few seconds.
In fact, although you’re able to get rid of the compiler, AoT can increases your bundle size. What AoT does is to generate code for your templates and DI, so if you have a lot of components the JavaScript generated for the templates may exceed the size of the compiler.
We took advantage of techniques such as:
- Bundling.
- Minification.
- Tree-shaking.
And later I blogged about this in “Building an Angular 2 Application for Production”.
Although we applied everything from the list we still didn’t have satisfying results.
We had a few more techniques in mind:
- Lazy-loading and prefetching of bundles.
- Service workers for caching/prefetching.
- Using an interactive App Shell.
Lazy-loading
After we migrated to the latest Angular router from our custom fork of it’s previous version, we tried to apply lazy loading. The technique sounds quite clear:
- Spread the functionality of the entire application among:
- Main bundle which includes functionality used across the entire application.
- Feature bundles which capture functionality from separate “bounded contexts”.
This could be applied recursively for each feature bundle, so we can have different sub-feature bundles, etc.
Although the idea was clear, achieving it wasn’t as simple as we expected. One of the main reasons why I still haven’t provided out-of-the-box solution for lazy loading in Angular Seed was the fact that it’s hard to implement a solution which works for any application. Fortunately, in our team we are able to agree on specific constraints and implement a build process which relays that given preconditions are met.
In the end, after a day of struggle with suffix trees and other graph algorithms, we came up with a solution which splits our application into three bundles. We load the bundles with SystemJS which is the default module loader for Angular.
Prefetching of bundles
One of the bundles we built represents the intro screen of the application (which includes the sign-up flow), there’s a bundle for the main functionality and finally, the core bundle which contains Angular and the common functionality among the first two.
In the prefetch scenario, we wanted to download the specific set of bundles required by the selected page once the user loads the application and after that prefetch the other bundles. We used similar strategy in the previous version of the application for prefetching templates.
Luckily, Angular provides a solution for prefetching of lazy-loaded modules out of the box. All we had to do was:
let routes: Routes = [...];

export const appRoutes = RouterModule.forRoot(routes, { preloadingStrategy: PreloadAllModules });
Service workers
Service workers provide a new API which allows us to achieve advanced network control over all requests going from the browser to the network.
The Angular team maintains the mobile toolkit which allows automatic management of service workers and generation of application shell. It uses some framework specifics which allow further automation of the entire process.
Thanks to the mobile toolkit we were able to generate a manifest file as part of our build process. Later the mobile toolkit reads this file and based on it’s content configures a service worker for management of static assets.
A few of it’s features we used are:
- Cache static assets in the service worker’s cache.
- Update only the assets which have changed.
The mobile toolkit helped us get additional performance boost for browsers which support the modern standards.

The image above shows tree map of the non-optimized core bundle which is used for bootstrapping the application. Its optimized and gzipped size is about ~200K.
Unfortunately, as you can see from the tree map above our core bundle was still too big and loading the application on 2G network required about 20s. This happens because in order to render any of the screens we needed at least two of the bundles:
- Core bundle which bootstraps the application.
- Main or intro bundle which is loaded after the core bundle decides which view needs to be rendered.
This required us to load at least ~400K of JavaScript (core bundle + main/intro) before being able to hide the loading screen and the worst part of that was that we needed to load the two bundles sequentially.
Interactive App Shell
In the intro screen of the product we have two pages of static content which explain to the parents what the application is all about. It is completely unnecessary to make the users wait until the assets of the application have been downloaded to let parents to read a few lines of text and decide if they want to sign-up or not.
What we decided to do was to take the templates of the components which represent these static pages and move them to a separate application which is not managed by Angular. We inlined the templates and wrote some custom JavaScript code which understands the basic routing directives, in particular routerLink. This way we were able to reuse the templates across our “interactive App Shell” and our Angular app.
Conceptually the “interactive App Shell” sounds similar to an application shell with the difference that it is an executable application with static content. All the JavaScript, styles and templates for these static pages were 20K in total. This way we decreased the initial load time for new users to about 5s on 2G network.
What we did was to initially download the application’s styles together with the “interactive App Shell”. Once the static application gets rendered, in background we start prefetching the core and intro bundles. Once the bundles are ready and the user decides to continue, we just bootstrap the Angular application. In case the user is ready to register but the bundles are not yet downloaded, we show a loading indicator and ask the user to hold on for a second.
In case the users are already logged in and don’t go to the main screen directly, the script files are most likely already in the cache because users have previously used the app. This makes the application’s load time instantaneous.
The best thing about the “interactive App Shell” is that it doesn’t change often. This helped us to cache its JavaScript bundle not only in service worker’s cache but also aggressively in the browser’s cache.
Ahead-of-Time compilation
This optimization is more related to improvements of the runtime performance, however, I’ll explain it here because using the static application we can clearly illustrate the performance boost we get. If you’re not familiar with the Ahead-of-Time compilation in Angular, you can take a look at this post.
As I mentioned above, once Angular RC5 was released, we migrated the application and introduced AoT compilation as part of the build process. In short, the core benefits of AoT compilation are:
- We no longer need the Angular compiler as part of the production bundle. This reduces the size a bit (but on the other hand we get all the ngfactories).
- The code becomes tree-shakable since the templates are compiled to JavaScript with static imports.
- We don’t have the runtime overhead of the Just-in-Time (JiT) compilation.
The first two points are quite self explanatory but the third point is the feature which has greatest impact over the user experience.
When we use our “interactive App Shell” approach we bootstrap the Angular application after the “interactive App Shell” has been already rendered. This means that we perform JiT compilation after we already have something onto the screen.
The images below demonstrate the delayed Angular bootstrap. The gif on the right shows the delayed bootstrap with JiT compilation enabled and the gif on the left demonstrates what happens when we’ve compiled the application as part of the build process, i.e. AoT compilation:

AoT

JiT
Lets consider the JiT case. Suppose the user had waited 10 seconds to download our entire application. Right after that Angular will have to perform JiT compilation which means that the user won’t see anything on the screen. Once the code for the templates and DI has been generated by the compiler, the user still needs to wait since the code needs to be parsed and just then the view could be rendered. On top of that, in some cases (Chrome extensions, strict CSP) JiT compilation is not possible since eval is not permitted.
It’s definitely worth it to use AoT compilation in your application.
Further improvements
A few other network performance improvements we did are:
Offline store
We were storing the entire application state into a big immutable object. This helped us apply additional optimization regarding the communication with the API server. Since it’s very unlikely to have change in the data model between frequent refreshes of the app, we were able to serialize the entire application’s store and save it in localStorage/indexDB.
This way, when the user comes back to the application before some predefined interval of time, we deserialize the state and feed our store. This helped us reduce the number of requests to the server even further.
SVG sprites
Since H2 and server push are not widely supported yet, we used SVG sprites in order to reduce the number of requests we send to the server. We automatically generated a sprite as part of our build process which contains a number of defs. Later, by using <use xlink:href="..."></use> we were referencing the individual images within an Angular component.
Since this approach doesn’t work very well in old versions of IE, we were fetching the sprite using XHR and inlining the individual defs within the component representing the SVG image. This is an approach similar to the one used by the polyfill svg4everybody.
Conclusion
In conclusion I can say that we really enjoyed the process of using the framework. The combination of TypeScript and Angular allows development of scalable applications with consistent codebase.
One of the most impactful runtime optimizations that we applied was the OnPush change detection strategy, which plays really well with immutable.js.
In terms of network performance, the bundle size is the biggest struggle. Although the “static app” approach was quite hacky, it help us achieve nice final results by loading the “real application” in background.
Last but not least, applying Ahead-of-Time compilation as part of our build process, helped us improve the initial rendering time.
Using Web Workers also sound quite tempting. Unfortunately, at the time of writing this article they are still not production ready. On top of that, I would not recommend using Web Workers in development since you will loose sense of how your application behaves when running in the main UI thread.
Resources
- Ahead-of-Time compilation in Angular
- Building an Angular Application for Production
- Scalable Single-Page Application Architecture
- Angular Seed
- An Overview of SVG Sprite Creation Techniques
- Angular Mobile Toolkit
- Progressive Web Apps
- Change Detection in Angular 2
- ngrx
- immutable.js
- Angular 2 RC5 - NgModules, Lazy Loading and AoT compilation
- Implementing the Missing “resolve” Feature of the Angular 2 Router