In this article I’m going to explain the difference between the concepts of view children and content children in Angular. We will take a look at how we can pass access these two different kinds of children from their parent component. Along the content we are also going to mention what the difference between the properties providers and viewProviders of the @Component decorator is.
You can find the source code of the current article at my GitHub account. So lets our journey begin!
Composing primitives
First of all, lets clarify the relation between the component and directive concepts in Angular. A typical design pattern for developing user interface is the composite pattern. It allows us to compose different primitives and treat them the same way as a single instance. In the world of functional programming we can compose functions. For instance:
map ((*2).(+1)) [1, 2, 3]
-- [4,6,8]
The Haskell code above we compose the functions (*2) and (+1) so that to each item n in the list will be applied the following sequence of operations n -> + 1 -> * 2.
Composition in the UI
In user interface we can apply composition in a similar way. We can think of the individual component as functions. These functions can be composed together in order and as result we get more complex functions.
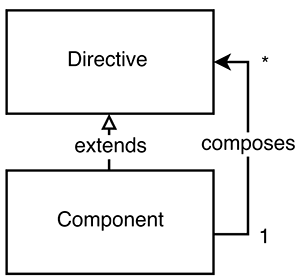
We can illustrate this graphically by the following structural diagram:

In the figure above we have two elements:
Directive- A self-contained element which holds some logic, but does not contain any structure.Component- An element, which specifies theDirectiveelement and holds a list of otherDirectiveinstances (which could also be components sinceComponentextendsDirective).
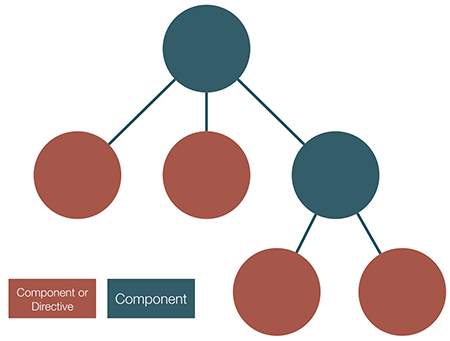
This means that using the preceding abstractions we can build structures of the following form:

On the figure above we can see a hierarchical structure of components and directives. The leaf elements on the diagram are either directives or components that don’t hold references to other directives.
Composition of Components in Angular
Now, in order to be more specific, lets switch to the context of Angular.
In order to better illustrate the concepts we are going to explore, lets build a simple application:
// ...
@Component({
  selector: 'todo-app',
  template: `
    <section>
      Add todo:
      <todo-input (todo)="addTodo($event)"></todo-input>
    </section>
    <section>
      <h4 *ngIf="todos.getAll().length">Todo list</h4>
      <todo-item *ngFor="let todo of todos.getAll()" [todo]="todo">
      </todo>
    </section>
    <ng-content select="app-footer"></ng-content>
  `
})
class TodoAppComponent {
  constructor(private todos: TodoList) {}

  addTodo(todo) {
    this.todos.add(todo);
  }
}
// ...
Yes, this is going to be “Yet another MV* todo application”. Above we define a component with selector todo-app which has an inline template, and defines a set of directives that it or any of its child components is going to use.
We can use the component in the following way:
<todo-app></todo-app>
Well, this is basically an XML, so between the opening and closing tags of the todo-app element we can put some content:
<todo-app>
  <app-footer>
    Yet another todo app!
  </app-footer>
</todo-app>
Basic Content Projection with ng-content
Now lets switch back to the todo-app component’s definition for a second. Notice the last element in its template: <ng-content select="app-footer"></ng-content>.
With ng-content we can grab the content between the opening and closing tag of the todo-app element and project it somewhere inside of the template! The value of the select attribute is a CSS selector, which allows us to select the content that we want to project. For instance, in the example above, the app-footer will be projected at the bottom of the rendered todo component.
We can also skip the select attribute of the ng-content element. In this case we will project the entire content passed between the opening and closing tags on the place of the ng-content element.
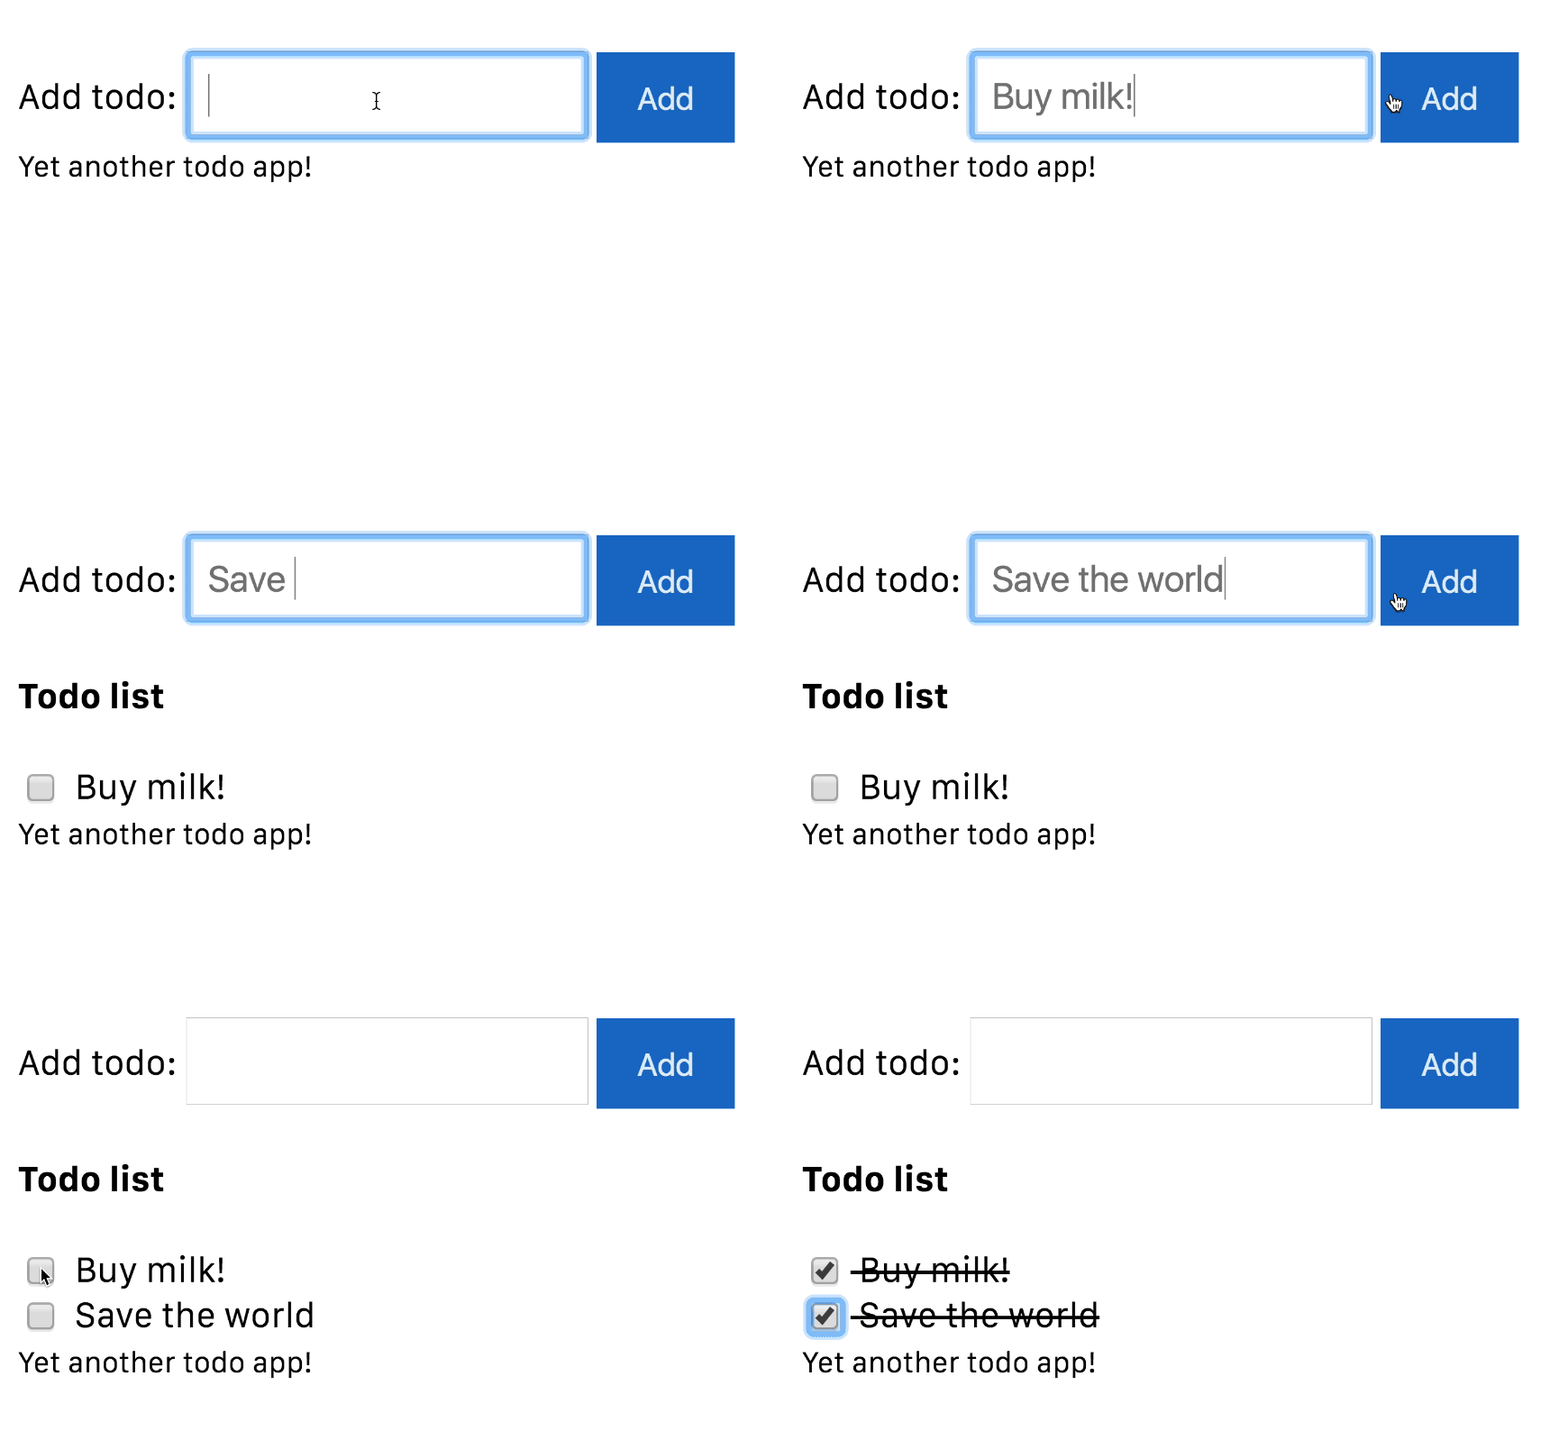
There are two more components which are not interesting for our discussion so we are going to omit their implementation. Once completeld our application will look as follows:

ViewChildren and ContentChildren
And yes, it was that easy! Now we are ready to define what the concepts of view children and content children are. **The children element which are located inside of its template of a component are called view children **. On the other hand, **elements which are used between the opening and closing tags of the host element of a given component are called content children **.
This means that todo-input and todo-item could be considered view children of todo-app, and app-footer (if it is defined as Angular component or directive) could be considered as a content child.
Accessing View and Content Children
Now comes the interesting part! Lets see how we can access and manipulate these two types of children!
Playing around with View Children
Angular provides the following property decorators in the @angular/core package: @ViewChildren, @ViewChild, @ContentChildren and @ContentChild. We can use them the following way:
import {ViewChild, ViewChildren, Component, AfterViewInit...} from '@angular/core';

// ...

@Component({
  selector: 'todo-app',
  template: `...`
})
class TodoAppComponent implements AfterViewInit {
  @ViewChild(TodoInputComponent) inputComponent: TodoInputComponent
  @ViewChildren(TodoComponent) todoComponents: QueryList<TodoComponent>;

  constructor(private todos: TodoList) {}
  ngAfterViewInit() {
    // available here
  }
}

// ...
The example above shows how we can take advantage of @ViewChildren and @ViewChild. Basically we can decorate a property and this way query the view of a component. In the example above, we query the TodoInputComponent child component with @ViewChild and TodoComponent with @ViewChildren. We use different decorators because we have different number of instances of the components that we want to select. For instance, we can select TodoInputComponent with @ViewChild because we have only a single instance of it, but we have multiple todo items, so for them we need to apply the @ViewChildren decorator.
Another thing to notice are the types of the inputComponent and todoComponents properties. The first property is of type TodoInputComponent. It’s value can be either null, if Angular haven’t found such child, or a reference to the instance of the component’s controller (in this case, reference to an instance of the TodoInputComponent class). On the other hand, since we have multiple TodoComponent instances which can be dynamically added and removed from the view, the type of the todoComponents property is QueryList<TodoComponent>. We can think of the QueryList as an observable collection, which can emit events once items are added or removed from it. We can access the Observable wrapped by the QueryList with its changes property. For further information click here.
Since Angular’s DOM compiler will process the todo-app component before its children, during the instantiation the inputComponent and todosComponen properties will have value undefined. Their values are going to be set in the ngAfterViewInit life-cycle hook.
Accessing Content Children
Almost the same rules are valid for the element’s content children, however, there are some slight differences. In order to illustrate them better, lets take a look at the root component, which uses the TodoAppComponent:
@Component({
  selector: 'app-footer',
  template: '<ng-content></ng-content>'
})
class FooterComponent {}

@Component(...)
class TodoAppComponent {...}

@Component({
  selector: 'demo-app',
  styles: [
    'todo-app { margin-top: 20px; margin-left: 20px; }'
  ],
  template: `
    <content>
      <todo-app>
        <app-footer>
          <small>Yet another todo app!</small>
        </app-footer>
      </todo-app>
    </content>
  `
})
export class AppComponent {}
In the snippet above we define two more components FooterComponent and AppComponent. FooterComponent visualizes all of the content passed between the opening and closing tags of its host element (<app-footer>content to be projected</app-footer>). On the other hand, AppComponent uses TodoAppComponent and passes FooterComponent between its opening and closing tags. So given our terminology from above, FooterComponent is a content child of TodoAppComponent. We can access it in the following way:
// ...
@Component(...)
class TodoAppComponent implements AfterContentInit {
  @ContentChild(FooterComponent) footer: FooterComponent;
  ngAfterContentInit() {
    // this.footer now points to the instance of `FooterComponent`
  }
}
// ...
As we can see from above, the only two differences between accessing view children and content children are the decorators and the life-cycle hooks in which they are initialized. For grabbing all the content children we should use @ContentChildren (or @ContentChild if there’s only one child), and the children will be set on ngAfterContentInit.
viewProviders vs providers
Alright! We’re almost done with our journey! As final step lets see what the difference between providers and viewProviders is (if you’re not familiar with the dependency injection mechanism of Angular, you can take a look at my book).
Lets peek at the declaration of the TodoAppComponent:
class TodoList {
  private todos: Todo[] = [];

  add(todo: Todo) {}

  remove(todo: Todo) {}

  set(todo: Todo, index: number) {}

  get(index: number) {}

  getAll() {}
}

@Component({
  // ...
  viewProviders: [TodoList]
  // ...
})
class TodoAppComponent {
  constructor(private todos: TodoList) {}
  // ...
}
Inside of the @Component decorator we set the viewProviders property to an array with a single element - the TodoList class. The TodoList class holds all the todo items, which are entered in the current session.
We inject the TodoList service in the TodoAppComponent’s constructor, but we can also inject it in any other directive’s (or component) constructor, which is used in the TodoAppComponent’s view. This means that TodoList is accessible from:
TodoListTodoComponentTodoInputComponent
However, if we try to inject this service in FooterComponent’s constructor we are going to get the following runtime error:
ORIGINAL EXCEPTION: No provider for TodoList!
This means that providers declared in given component with viewProviders are accessible by the component itself and all of its view children.
In case we want to make the service available to FooterComponent as well we need to change the declaration of the component’s providers from viewProviders to providers.
When to use viewProviders?
Why would I use viewProviders, if such providers are not accessible by the content children of the component?
Suppose you’re developing a third-part library, which internally uses some services. These services are part of the private API of the library and you don’t want to expose them to the users. If such private dependencies are registered with providers and the user passes content children to any of the components exported by the public API of your library, she will get access to them.
However, if you use viewProviders, the providers will not be accessible from the outside.
Summary
In this article we took a brief look at how we can compose components and directives. We also explained what the difference between content children and view children is, as well as, how we can access these two different kinds of children.
As final step we explained the semantics between the viewProviders and providers properties of the @Component decorator. If you have further interest in the topic I recommend you the book I’m working on “Getting Started with Angular”.